# Set Up the Tools
This page gets a workstation ready to record: the repository built, the CTS tool environments
created and a headset streaming through CloudXR. Do it once per clone; both suites share every step.
Run the commands from the repository root.
> ##### Steps
>
> * [1. Check the requirements](#check-the-requirements)
> * [2. Build the repository](#build-the-repository)
> * [3. Create the tool environments](#create-the-tool-environments)
> * [4. Connect the headset](#connect-the-headset)
> * [Troubleshooting](#troubleshooting)
## 1. Check the requirements
| Requirement | Details |
|------------------------------------------|-------------------------------------------------------------------------------------------------------------------------------------------------------------------------------------------------------------------------------------------------------------------------------------------------------------------|
| Linux workstation | Recording runs on Linux. The checker and the viewer also run on macOS, so you can check a
take on another machine. |
| Source clone with `git-lfs` | The CTS runs from a source clone; the `isaaccapture` package does not include it. The
spoken cues are Git LFS audio, so install `git-lfs` before cloning, or run
`git lfs pull` in an existing clone. |
| The repository built for **Python 3.12** | The capture environment installs the cp312 `isaaccapture` wheel. The default build makes
3.11. See step 2. |
| `uv`, `curl` and `unzip` | The setup scripts use them to build the environments and fetch `flatc`. |
| `aplay` (`alsa-utils`) | The capture panel plays the spoken cues through it. Without it the panel says so and the
take runs with on-screen cues only. Install with `sudo apt install alsa-utils`. Speakers
are optional: the cues play on the workstation, not the headset, and the capture panel
also shows each one as text. |
| An XR headset and CloudXR | Needed even when your device produces the joints: the capture’s OpenXR session comes from
CloudXR. See step 4. |
| Your plugin, installed | `cmake --install build` installs every built plugin into `install/plugins/`; add
`--component ` to install one, if its plugin declares a component. Headset hand
tracking and PICO body tracking need no plugin. |
| Space and a helper | Hand: a table and a chair. Full body: room to stand, raise both arms and squat. A second
person at the screen makes either suite easier. |
## 2. Build the repository
Configure with Python 3.12 from the start. A build tree keeps the Python version it was configured
with, so delete an existing `build/` before switching.
```bash
cmake -B build -DISAAC_TELEOP_PYTHON_VERSION=3.12
cmake --build build --parallel
cmake --install build
```
A plugin behind a `BUILD_PLUGIN_` option builds only when you add
`-DBUILD_PLUGIN_=ON` to the first line.
[Build from Source](../development/build_from_source/index.md) lists the build prerequisites, and
[Build System](../references/build.md) explains per-Python-version build trees.
## 3. Create the tool environments
Each suite has a checker environment and a capture environment. Run the line for each suite you
need; it sets up the checker first, because the capture environment reads recordings through the
bindings the checker generates:
```bash
CTS=src/python/isaaccapture/cts
$CTS/hand/checker/setup_env.sh --panel && $CTS/hand/capture/setup_env.sh
$CTS/full_body/checker/setup_env.sh --panel && $CTS/full_body/capture/setup_env.sh
```
`--panel` adds the viewer, which replays a take and packages it for submission. To only check
takes on another machine, such as a Mac, run the checker script alone there. The scripts are
idempotent and write only inside their own directory; re-run them after pulling or rebuilding.
## 4. Connect the headset
CloudXR is the OpenXR runtime the capture runs on. **Start recording** waits until a headset has
connected, even when your device produces the joints. Use the capture interpreter of either suite,
and set `PY` in each terminal you open:
```bash
PY=$PWD/src/python/isaaccapture/cts/hand/capture/.venv/bin/python
# or …/cts/full_body/capture/.venv/bin/python
```
1. Start the CloudXR service in a terminal of its own and leave it open. The first time, it shows a
link to the CloudXR licence and asks you to accept it; your acceptance is remembered.
```bash
$PY -m isaaccapture.cloudxr.service run
```
It prints where the runtime and proxy logs are written; a headset that will not connect says
why there. Run one service per workstation.
2. In a second terminal, set `PY` again and print the client URL:
```bash
$PY -m isaaccapture.cloudxr.webclient --print-only
```
It prints the streaming target on its `stream` row (`:48322`), then the client URL.
3. Put the headset on the same network as the workstation. In the headset browser, open
`https://:48322/` **first** and accept the self-signed certificate: **Advanced**, then
**Proceed**. Until you do, the client loads but CONNECT fails silently.
4. Open the client URL and press **CONNECT**.
### What the certificate warning looks like
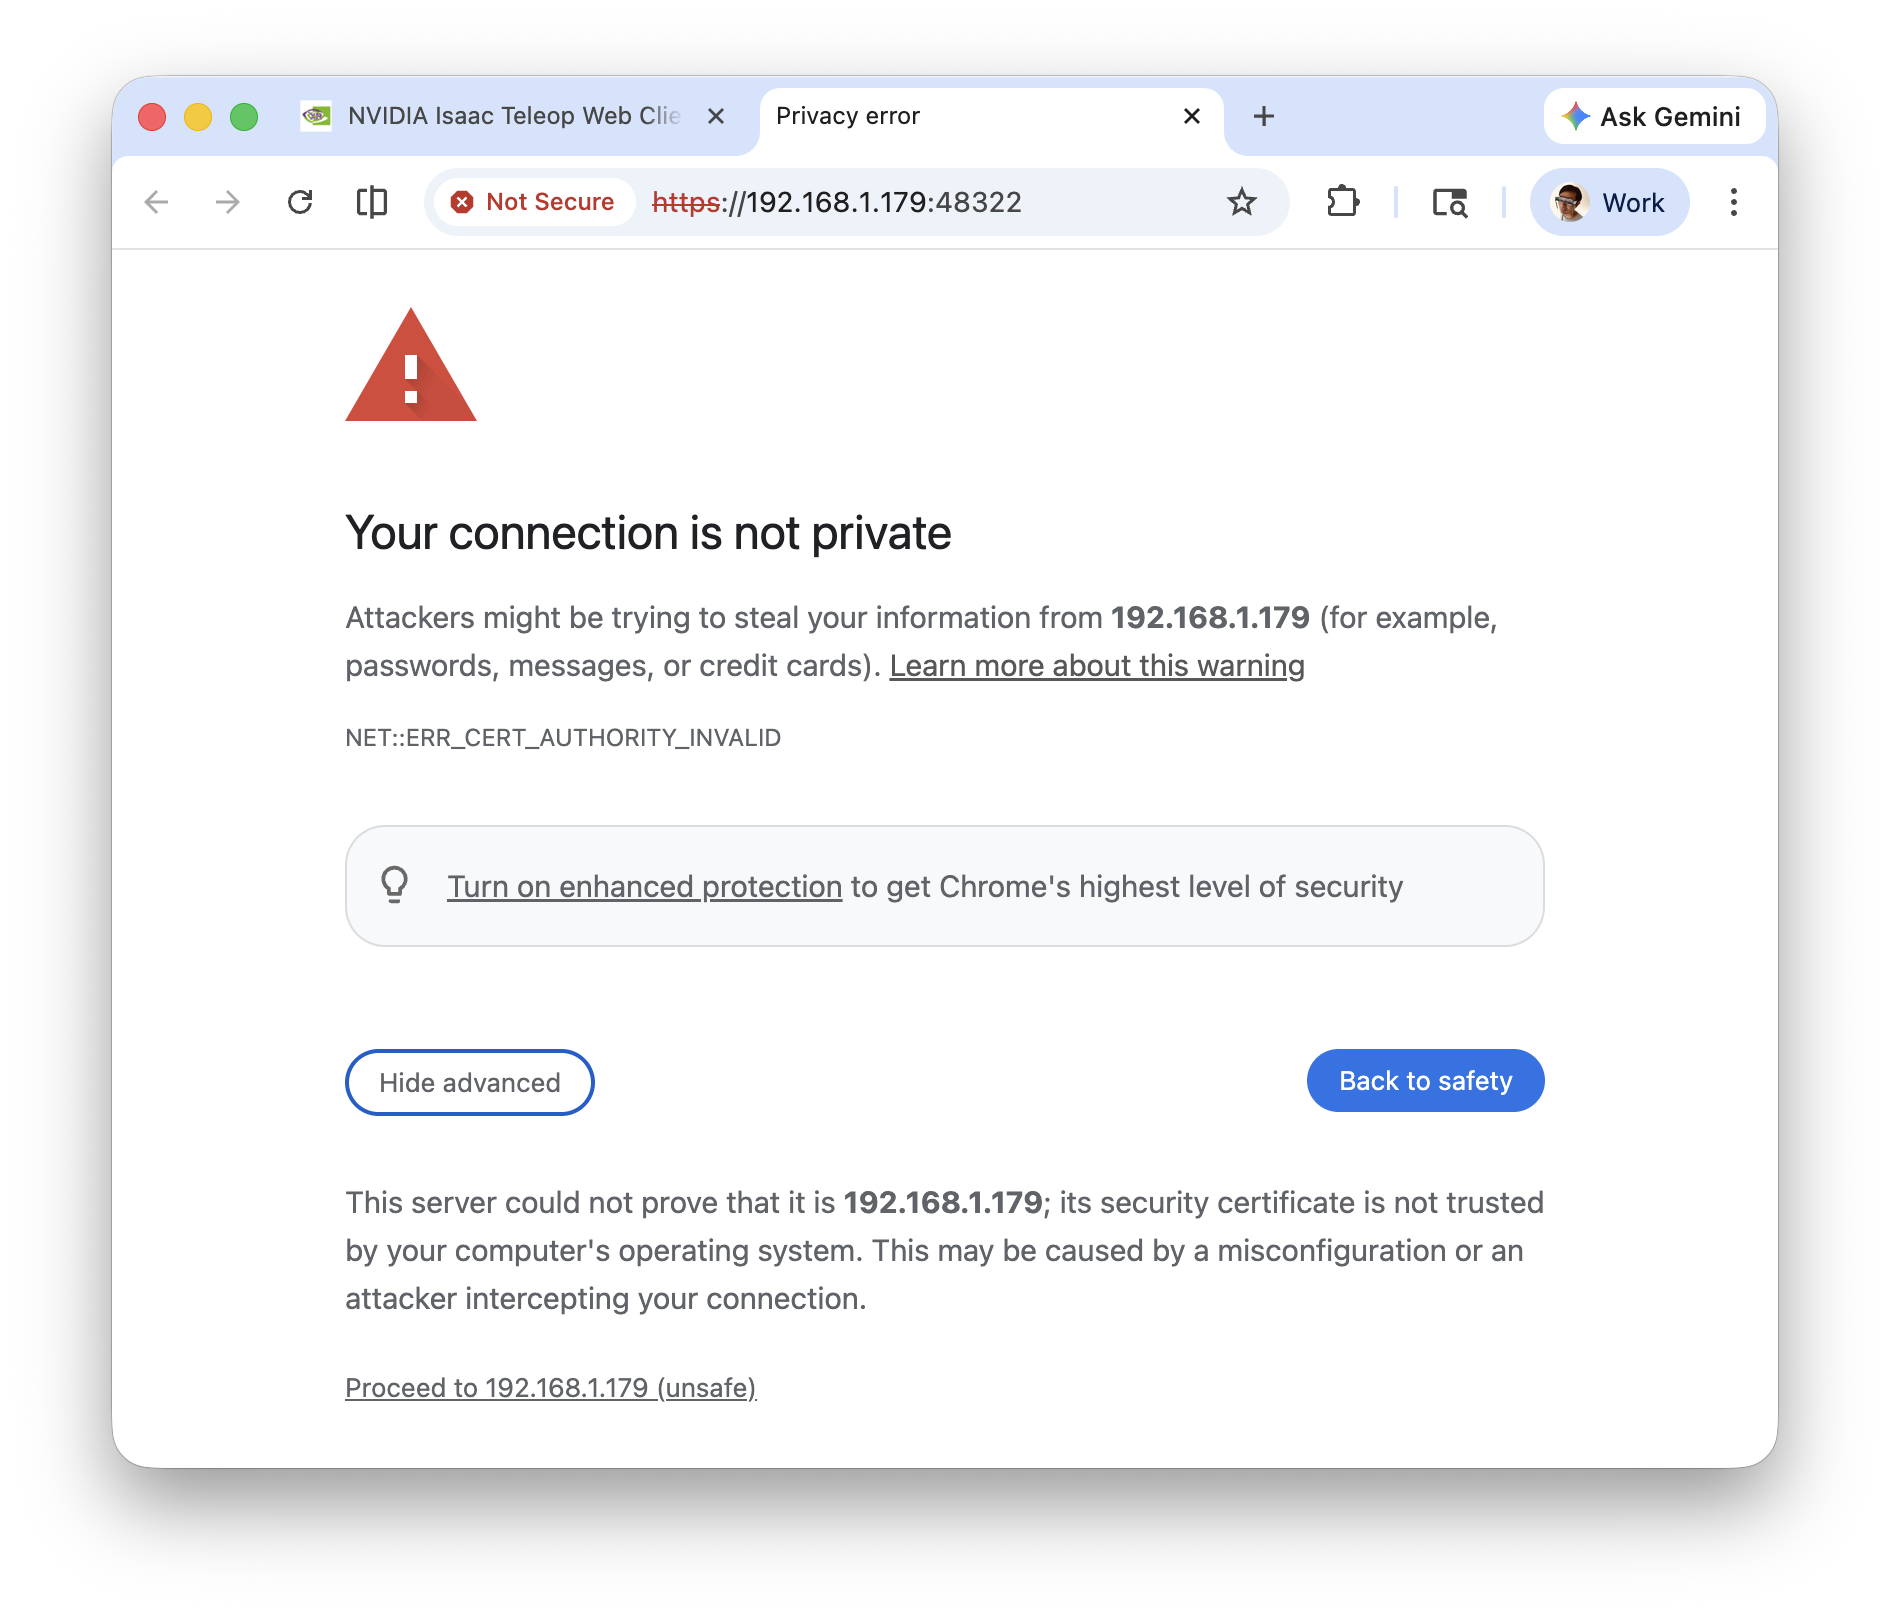
Choose Advanced, then Proceed. The next page reads Certificate Accepted.
The workstation firewall must allow the CloudXR ports ([4. Whitelist ports for Firewall](../teleop/quick_start.md#whitelist-firewall-ports)). For
device profiles, a detached service or opening the client over USB, see
[CloudXR Service](../references/cloudxr.md). For PICO body tracking, set up the trackers first:
[Body Tracking](../device/body_tracking/index.md).
## Troubleshooting
| What you see | What to do |
|---------------------------------------------------------------------------|-------------------------------------------------------------------------------------------------------------------------------------------------------|
| `no isaaccapture wheel in …/{install,build}/wheels; build the repo first` | Build the repository (step 2), then re-run the capture setup script. |
| The wheel will not install into the capture environment | The wheel is not cp312. Delete `build/`, rebuild with Python 3.12 (step 2) and re-run
the capture setup script. |
| `run …/checker/setup_env.sh first; the panel decodes the take it writes` | Run the checker’s setup script before the capture one. |
| `bfbs differs from the repo golden` | The schema in your checkout no longer matches the one the CTS judges. Restore
`src/core/schema/` to the commit you are testing. |
| `… is a Git LFS pointer, not audio` | Install `git-lfs` and run `git lfs pull` in the repository. |
| The client loads but CONNECT does nothing | Accept the certificate at `https://:48322/` first. Check that the headset is on the
same network and the firewall allows the CloudXR ports. |
| A second CloudXR service will not start | One is already running. `$PY -m isaaccapture.cloudxr.service status` reports it;
`service stop` ends a detached one, Ctrl+C a foreground one. |
Next, record a take: [Hand Suite](hand.md) or [Full-Body Suite](full_body.md).