# Body Tracking
Isaac Teleop supports streaming full-body tracking data from an XR headset
through the CloudXR WebXR client to the teleop server. The server exposes the
body skeleton to applications through the `FullBodyTracker` tracker and
the OpenXR `XR_BD_body_tracking` extension.
Body tracking support currently targets the **PICO 4 Ultra Enterprise** with
**PICO Motion Trackers**. The rest of this guide covers PICO hardware setup
and the BD skeleton format used on the server.
#### IMPORTANT
Full body tracking requires PICO’s **enterprise features**. They are
available out of the box on the
[PICO 4 Ultra Enterprise](https://www.picoxr.com/global/products/pico4-ultra-enterprise)
headset. On a consumer PICO 4 Ultra, the browser does not grant the
`body-tracking` WebXR feature by default — no body data reaches the
server, even with Motion Trackers paired and calibrated. Consumer devices
can gain the feature through enterprise activation: contact PICO, then
use the **Activate enterprise account** option in the headset settings.
#### NOTE
Meta Quest 3/3S also expose body tracking to WebXR via inside-out body
tracking (IOBT), and the CloudXR client will stream it. However the Quest
skeleton is mapped to the PICO BD 24-joint layout in the current version,
and accuracy is lower since there are no physical trackers. See
[Quest Body Tracking (Limited Support)](#quest-body-tracking-limited-support) for details.
#### SEE ALSO
[GR00T-WholeBodyControl (SONIC)](https://nvlabs.github.io/GR00T-WholeBodyControl/tutorials/isaac_teleop_publisher_setup.html) can consume this CloudXR skeleton on a G1 robot as well.
See that project’s setup guide for additional details.
> ##### On this page
>
> * [Setting Up PICO Motion Trackers](#setting-up-pico-motion-trackers)
> * [Instructions](#instructions)
> * [How Full Body Tracking Works](#how-full-body-tracking-works)
> * [Skeleton profile](#skeleton-profile)
> * [Joint skeleton (24 joints)](#joint-skeleton-24-joints)
> * [Server-side access](#server-side-access)
> * [Troubleshooting](#troubleshooting)
> * [Recording and Replay](#recording-and-replay)
> * [Quest Body Tracking (Limited Support)](#quest-body-tracking-limited-support)
> * [SOMA pose transport](#soma-pose-transport)
## Setting Up PICO Motion Trackers
Full body tracking uses
[PICO Motion Trackers](https://www.picoxr.com/global/products/pico-motion-tracker)
paired with a PICO 4 Ultra Enterprise headset. Make sure the PICO browser is
updated to a version that supports body tracking. The following configurations
are supported:
- **5 trackers:** best tracking quality across all 24 joints.
Two wear modes are available: 2 ankles + 2 wrists + 1 waist, or 2 ankles +
2 thighs + 1 waist.
- **3 trackers:** 2 ankles + 1 waist. Upper-body joints are estimated from the
headset and controllers; lower-body tracking remains accurate.
- **2 trackers:** 2 ankles only. Provides lower-body tracking with upper-body
estimation. Least hardware, but reduced accuracy for waist and sitting/lying
postures.
### Instructions
1. Tap the **clock / Wi-Fi / battery icon** in the lower-right corner of the
PICO menu. A picture of the headset appears; above it is a small circular
button with a wristband-and-tracker icon. If the button is missing, open the
**Motion Tracker** app directly.
2. Select a **wear mode** that matches the number of trackers you have and best
fits your use case.
3. Click the **Pair** button.
4. On each tracker, press and hold the top button until the lights start
flashing (pairing mode).
5. Strap the trackers on following the placement shown in the app for your
chosen wear mode. Scrunch down any baggy clothing so the trackers are visible
to the headset cameras.
6. Click **Calibrate** and follow the instructions in the Motion Tracker app.
Before each session, confirm all trackers are powered on, paired, and
calibrated.
## How Full Body Tracking Works
### Skeleton profile
Body tracking data uses the
[XR_BD_body_tracking](https://registry.khronos.org/OpenXR/specs/1.1/html/xrspec.html#XR_BD_body_tracking)
OpenXR extension profile defined by ByteDance (BD). This is the only body
tracking profile currently supported by the CloudXR runtime.
When the CloudXR WebXR client starts a session, it requests the `body-tracking`
feature from the browser. Each frame, the CloudXR client library reads the body
joint data provided by the PICO runtime and streams it to the server. No
additional configuration is needed in the WebXR client; body tracking is
enabled automatically when the device supports it.
### Joint skeleton (24 joints)
The BD profile defines a 24-joint skeleton. Each joint provides a position
(vec3 in meters), an orientation (quaternion), and a per-joint `is_valid` flag
indicating whether the tracker successfully resolved that joint in the current
frame.
| Index | Joint | Parent |
|---------|----------------|----------------|
| 0 | Pelvis | *(root)* |
| 1 | Left Hip | Pelvis |
| 2 | Right Hip | Pelvis |
| 3 | Spine 1 | Pelvis |
| 4 | Left Knee | Left Hip |
| 5 | Right Knee | Right Hip |
| 6 | Spine 2 | Spine 1 |
| 7 | Left Ankle | Left Knee |
| 8 | Right Ankle | Right Knee |
| 9 | Spine 3 | Spine 2 |
| 10 | Left Foot | Left Ankle |
| 11 | Right Foot | Right Ankle |
| 12 | Neck | Spine 3 |
| 13 | Left Collar | Spine 3 |
| 14 | Right Collar | Spine 3 |
| 15 | Head | Neck |
| 16 | Left Shoulder | Left Collar |
| 17 | Right Shoulder | Right Collar |
| 18 | Left Elbow | Left Shoulder |
| 19 | Right Elbow | Right Shoulder |
| 20 | Left Wrist | Left Elbow |
| 21 | Right Wrist | Right Elbow |
| 22 | Left Hand | Left Wrist |
| 23 | Right Hand | Right Wrist |
### Server-side access
On the server, body tracking data is consumed through the
`FullBodyTracker` tracker (see [Spatial Trackers and Device Data](../trackers.md) for the full tracker
reference). The tracker exposes a `get_body_pose()` method that returns the
24-joint skeleton each frame (or null when body tracking is not available).
Joint data follows the `FullBodyPose` FlatBuffers schema defined in
`src/core/schema/fbs/full_body.fbs`.
The `all_joint_poses_tracked` quality flag indicates whether every joint was
successfully tracked in the current frame. When it is false, consult individual
joint `is_valid` flags to determine which joints have valid poses.
For a minimal C++ reader see `examples/schemaio/full_body_printer.cpp`, which
creates the tracker, queries the required OpenXR extensions, and prints the
joint data each frame through `DeviceIOSession`. The Python equivalent is
`tests/python/xr_runtime/test_full_body_tracker.py`. Neither embeds
`CloudXRLauncher`, so start the runtime first and source its environment in
the shell that launches them:
```bash
python -m isaaccapture.cloudxr.service start --accept-eula # runs in the background
source ~/.cloudxr/run/cloudxr.env
./install/examples/schemaio/full_body_printer
```
See [CloudXR Service](../../references/cloudxr.md#dedicated-cloudxr-runtime) and
[Load CloudXR environment variables](../../references/cloudxr.md#load-cloudxr-environment-variables) for the full service setup.
### Troubleshooting
- **Body tracking does not work on a consumer PICO 4 Ultra.** WebXR body
tracking is an enterprise feature; consumer devices do not enable it by
default. Contact PICO about enterprise activation, then use the
**Activate enterprise account** option in the headset settings.
- **No body tracking data arrives on the server.** Confirm the headset has
enterprise features (see above). Verify all PICO motion trackers are
paired, powered on, and calibrated. Confirm the PICO browser is up to
date.
- **The printer prints** `valid=0/24 pelvis=[not tracked] head=[not tracked]`
**on every sample.** The runtime supports body tracking but no joint is
tracked. This is also the output before a headset connects. With the headset
connected, check that body tracking is enabled, the Motion Trackers are paired
and calibrated, and the headset has enterprise body-tracking support.
- **The printer prints** `[body tracking inactive]`. The OpenXR runtime
reports that the system does not support body tracking, so the tracker
returns no data. A printer that never reaches `[Step 4] Reading samples...`
is still waiting for the runtime / headset instead.
- **Some joints report** `is_valid: false`. The PICO runtime may
temporarily lose tracking for individual joints during fast movement or
partial occlusion. These joints will recover automatically once tracking is
re-acquired.
## Recording and Replay
Full body sessions can be previewed live, captured to MCAP, and replayed
offline through the same retargeting pipeline — no headset required during
replay. See [MCAP Recording & Replay](../../references/mcap_record_replay.md) for the API and the
`live_full_body.py` / `record_full_body.py` / `replay_full_body.py`
example.
Recording is also available directly from C++: pass a `McapRecordingConfig`
to `DeviceIOSession::run()` with the tracker mapped to the `full_body`
channel base name. `examples/mcap_record_replay/cpp/record_full_body.cpp`
demonstrates this — a file recorded there replays unchanged with
`replay_full_body.py`. Give it an output directory and each run writes a
fresh timestamped take into it. With the runtime started and its environment
sourced as above, and the example package installed as in
[MCAP Recording & Replay](../../references/mcap_record_replay.md), run from the repo root:
```bash
./install/examples/mcap_record_replay/cpp/record_full_body 5 recordings/
python -m isaaccapture_examples.mcap_record_replay.replay_full_body
```
The replay picks the newest `full_body_*.mcap` under `./recordings/`.
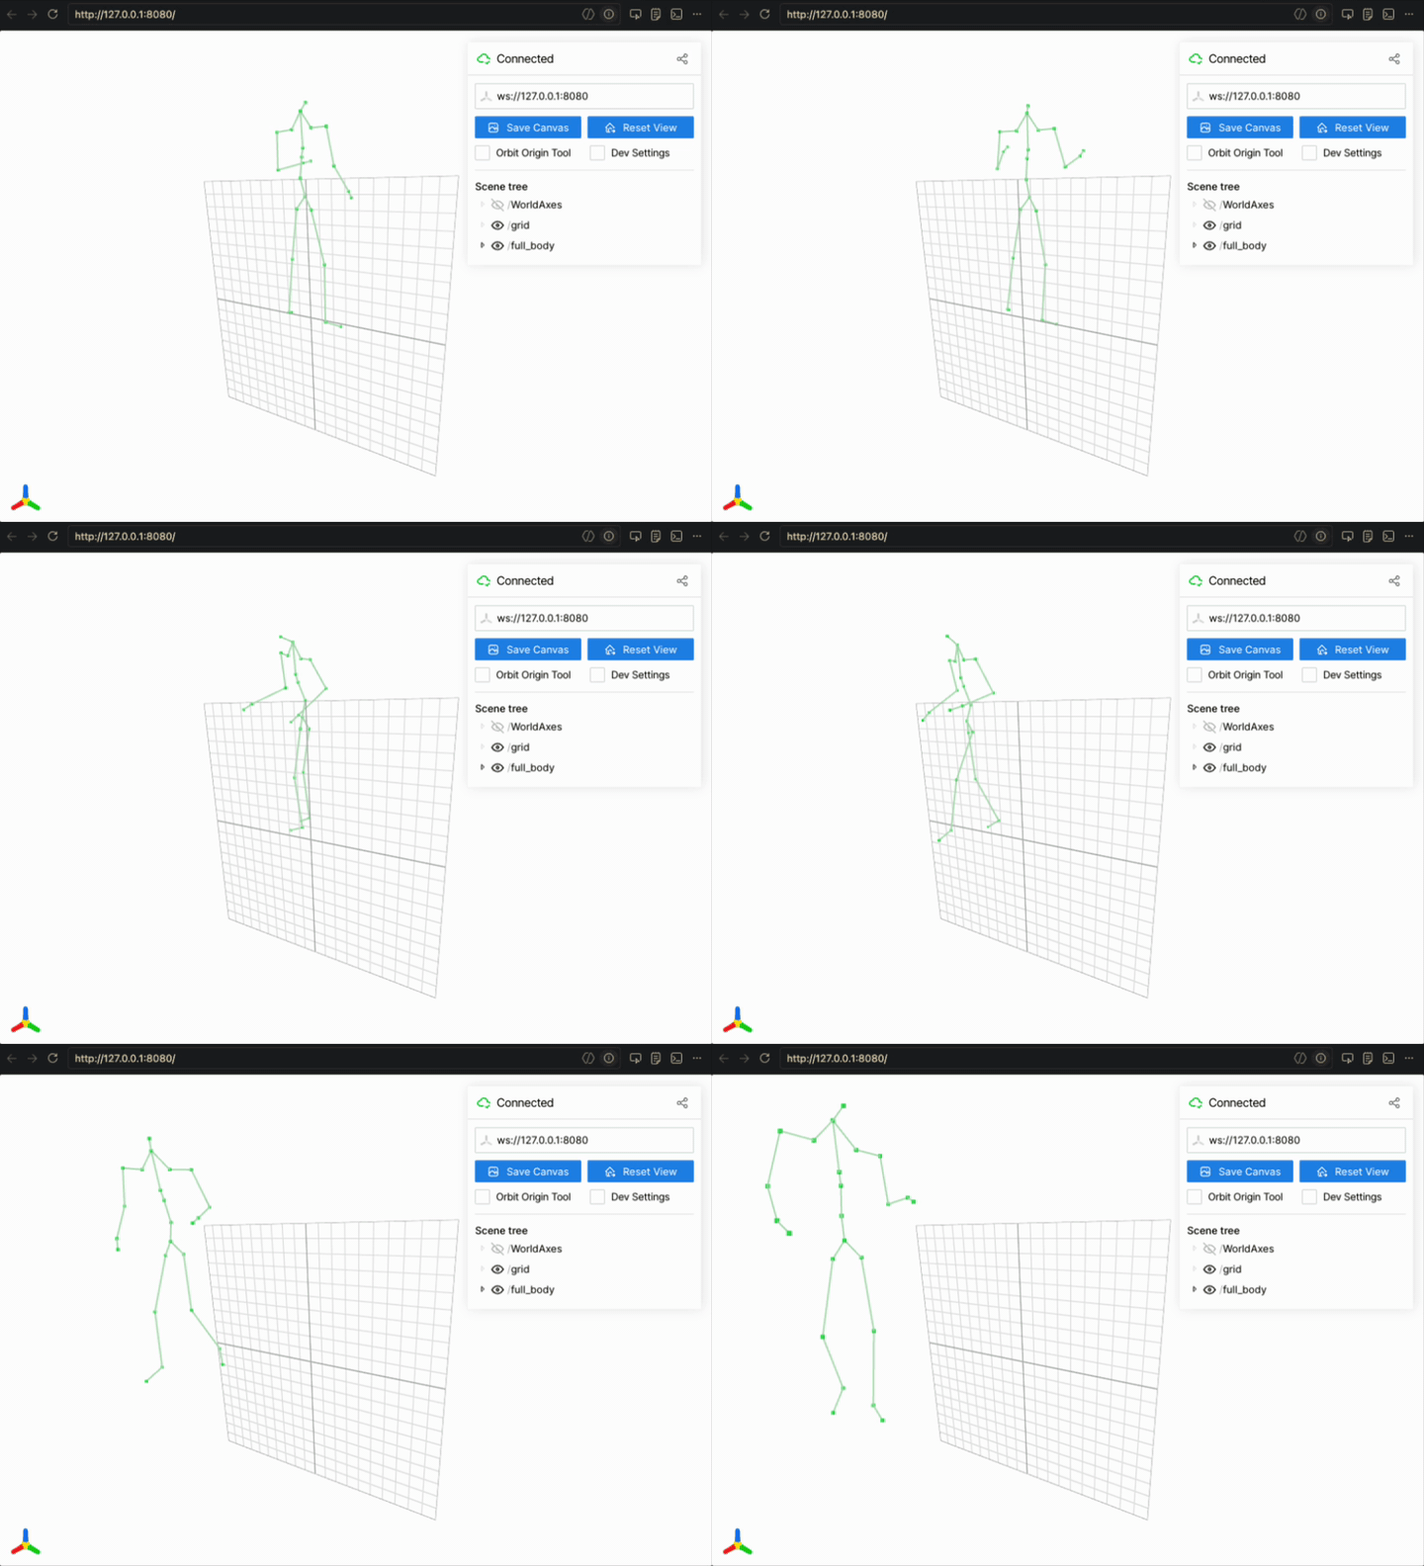
`replay_full_body.py` visualizing a recorded BD 24-joint skeleton in viser.
## Quest Body Tracking (Limited Support)
Meta Quest headsets expose inside-out body tracking (IOBT) to WebXR sessions.
The CloudXR WebXR client will stream this data when the Quest browser grants the
`body-tracking` feature.
However, in the current version the Quest IOBT skeleton is mapped to the PICO BD
24-joint layout before being sent to the server. This means the server always
receives data in the `XR_BD_body_tracking` joint format regardless of the
source headset.
#### NOTE
Quest body tracking does not require external trackers. It uses the
headset’s built-in cameras. Tracking quality may differ from the
tracker-based PICO solution, particularly for lower-body joints.
## SOMA pose transport
For body and hand data from vendor adapters, see the SOMA transport guide.
* [SOMA Pose Transport](soma.md)