# Camera Streaming
`camera_viz` is the reference camera-streaming sample built on [Televiz](../development/televiz.md) (`isaaccapture.viz`). It captures frames from one or more cameras
and streams them to an XR headset — one plane per camera, aspect-fit — either directly or from a
robot to a workstation over the network (split mode). It can also stream [recorded camera
data](#recorded-camera-streaming) — a video file replayed in place of a live camera — and render
to a desktop window instead of the headset.
Controllers adjust the camera view, including its placement, shape, and stereo settings.
This sample does not send robot commands or record robot demonstrations; see [Next steps](#next-steps)
for robot-control and recording integrations.
The sample lives at [examples/camera_viz/](https://github.com/NVIDIA/IsaacCapture/tree/main/examples/camera_viz). This page walks you
from setup and a camera-free first run to real cameras and the robot → workstation split mode.
It is the primary user guide for the sample, including commands, configuration, controller
bindings, and troubleshooting.
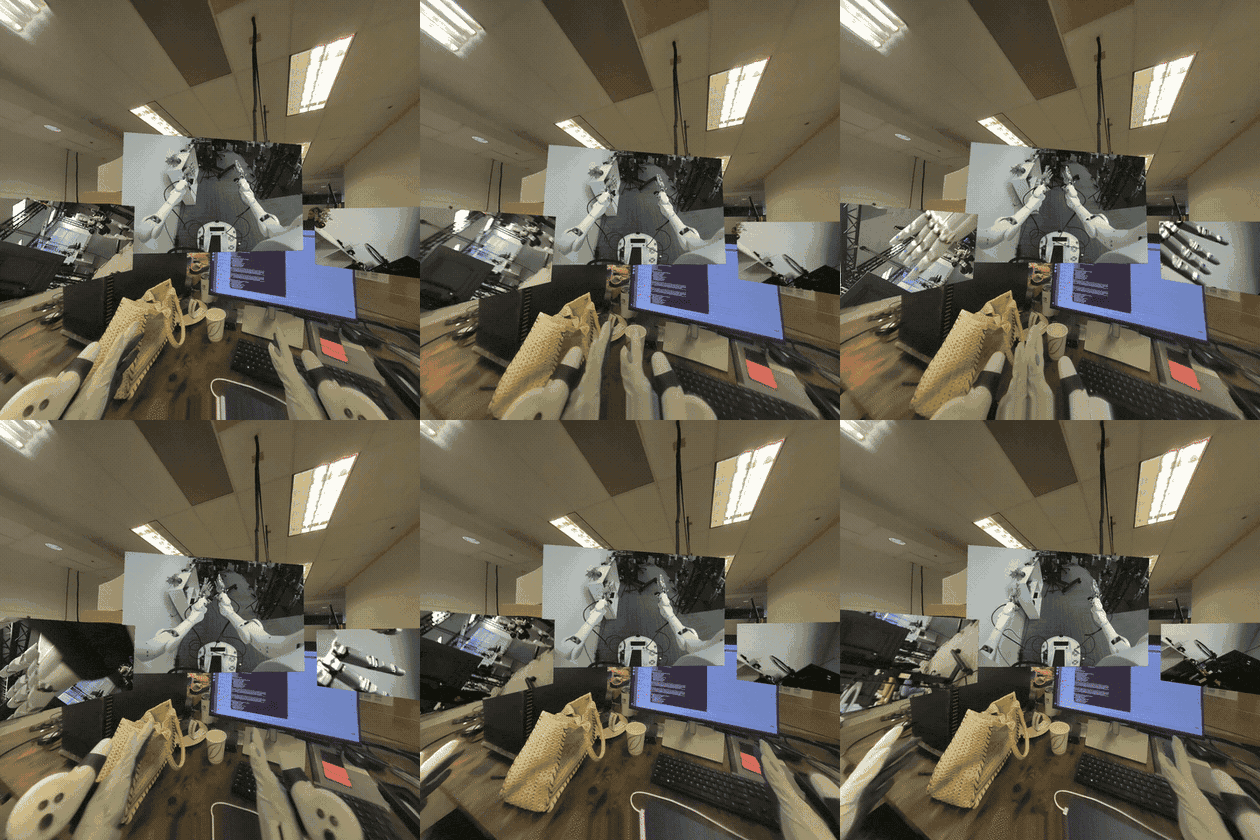
`camera_viz` in XR mode — one plane per camera.
> ##### On this page
>
> * [Requirements](#requirements)
> * [Setup](#setup)
> * [Using an external virtual environment](#using-an-external-virtual-environment)
> * [Jetson CUDA prerequisites](#jetson-cuda-prerequisites)
> * [OAK-D USB permissions](#oak-d-usb-permissions)
> * [Command overview](#command-overview)
> * [Web client for camera visualization](#web-client-for-camera-visualization)
> * [First run — a recording, no camera required](#first-run-a-recording-no-camera-required)
> * [First-session checklist](#first-session-checklist)
> * [Replaying your own recording](#replaying-your-own-recording)
> * [Supported sources](#supported-sources)
> * [Running with a real camera](#running-with-a-real-camera)
> * [Jetson Argus / GMSL cameras](#jetson-argus-gmsl-cameras)
> * [Display modes](#display-modes)
> * [Controller bindings](#controller-bindings)
> * [Stereo plane distance](#stereo-plane-distance)
> * [Display surfaces](#display-surfaces)
> * [Aiming an equirect](#aiming-an-equirect)
> * [CloudXR runtime flags](#cloudxr-runtime-flags)
> * [Split mode — robot → workstation over RTP](#split-mode-robot-workstation-over-rtp)
> * [Loopback](#loopback)
> * [Configuration](#configuration)
> * [Status panel](#status-panel)
> * [Troubleshooting](#troubleshooting)
> * [How it works](#how-it-works)
> * [Sharing the XR session with TeleopSession](#sharing-the-xr-session-with-teleopsession)
> * [Next steps](#next-steps)
## Requirements
- A workstation meeting the [system requirements](requirements.md) (Ubuntu, NVIDIA
GPU, CUDA driver) — every source hands frames to the renderer GPU-resident via CuPy.
- For Jetson platforms:
- **Orin:** [JetPack 6.2.x](https://developer.nvidia.com/embedded/jetpack-sdk-62) or
[7.2.1](https://docs.nvidia.com/jetson/agx-orin-devkit/user-guide/latest/setup_jetpack.html)
- **Thor:** [JetPack 7.x](https://developer.nvidia.com/embedded/jetpack)
- For the default XR mode, a headset to connect as the CloudXR client — follow the
[quick start](../teleop/quick_start.md) step [5. Connect an XR headset](../teleop/quick_start.md#connect-xr-headset). The viewer
launches the CloudXR runtime itself; nothing to start separately. No headset handy?
`--mode window` renders to a desktop window instead.
- **CUDA development components:** matching runtime, NVRTC, and headers for CuPy kernels.
JetPack 7.2.1 uses CUDA 13.2; see [Jetson CUDA prerequisites](#camera-streaming-jetson-cuda).
- **Camera — optional, recommended:** USB / UVC, OAK-D, or supported ZED camera for a live feed.
A recording or synthetic pattern works without a camera; ZED SDK capture needs `setup --with-zed`.
- **XR controllers — optional:** for adjusting the view with [Controller bindings](#camera-streaming-controls).
- **CloudXR setup:** see Quick Start for [first-launch requirements](../teleop/quick_start.md#run-cloudxr-server)
and [firewall configuration](../teleop/quick_start.md#whitelist-firewall-ports).
- For Jetson Argus cameras, a Jetson image with libargus, CUDA, EGL, and the Jetson Multimedia API
headers installed. The optional Argus native source is built only when setup is run with
`--with-argus`.
## Setup
Clone the repository if you haven’t already (quick start step [1. Check out code base (for examples)](../teleop/quick_start.md#check-out-code-base)), then
run the sample’s one-time setup:
```bash
examples/camera_viz/camera_viz.sh setup
source examples/camera_viz/.venv/bin/activate
```
On Jetson, add `--jetson`. If CUDA components are missing, see
[Jetson CUDA prerequisites](#camera-streaming-jetson-cuda) below.
There is no need to install the `isaaccapture` pip package yourself. `setup` builds the
sample’s own environment: `isaaccapture[cloudxr]` — the `cloudxr` extra is not optional here,
since XR is the default display mode and the viewer launches the runtime itself — plus every
other Python dependency, into an isolated `.venv/` via `uv` (no `--system-site-packages`).
For `isaaccapture` it resolves a release matching the checkout’s major/minor version, falling
back to a release candidate and then, after asking, to a source build of the surrounding
checkout (see [scripts/_install_deps.sh](https://github.com/NVIDIA/IsaacCapture/blob/main/examples/camera_viz/scripts/_install_deps.sh); `--wheel` and `--build-from-source` override
the choice). It also installs the sample itself there as an editable package, which is what
`python -m isaaccapture_examples.camera_viz` imports. When required system packages are
missing, it prints the exact `apt-get` line to approve — declining, or a non-interactive run,
aborts.
Setup selects CuPy for the toolkit at `CUDA_PATH`, if set. Otherwise it takes the first CUDA
12 or 13 toolkit among those of each `nvcc` on `PATH` and `/usr/local/cuda`: first one
with a version file (`version.json`, `version.txt`, or a `cuda-X.Y` directory), then one
whose `nvcc --version` it can read and whose `include/` holds the CUDA headers, such as the
distro `nvidia-cuda-toolkit` at `/usr`. CuPy finds the headers of that second kind only
through `CUDA_PATH`, so setup records it in the venv, and `camera_viz.py`,
`camera_streamer.py` and `scripts/check_cuda.py` set it unless `CUDA_PATH` or
`CUDA_HOME` already is. Setup checks the loaded NVRTC version and executes a GPU kernel
before reporting success.
By default `setup` provisions the direct-mode path — USB / UVC and OAK-D camera support. Split
mode (RTP), Jetson Argus, and ZED support are opt-in because they need additional native
dependencies or vendor SDKs. Flags trim or extend that:
| Flag | Effect |
|-----------------------|--------------------------------------------------------------------------------------------------------------------------------------------------------------------------------------------------------------------------------------------------------------|
| `--no-v4l2` | Skip USB / UVC webcam support (`opencv-python`). |
| `--no-oakd` | Skip OAK-D support (`depthai`). |
| `--with-rtp` | Also install the split-mode dependencies: the GStreamer system packages, PyGObject, and the
native NVENC/NVDEC codec build. Required for `loopback` and for any config with
`source: rtp`; implied by `--sender-only`. Direct mode does not need it. |
| `--with-argus` | Build the optional Jetson Argus native source (`type: argus`). Requires libargus, CUDA,
EGL, and Jetson Multimedia API headers on the machine. |
| `--with-zed` | Also build + install the ZED SDK’s Python API (`pyzed`). Requires the ZED SDK on the
machine (default `/usr/local/zed`; override with `--zed-sdk PATH`). |
| `--sender-only` | Split mode only — robot-side install of just the sender’s dependencies. |
| `--jetson` | Enable Jetson CUDA library discovery for direct or split mode. With RTP enabled, also
check for the matching NVRTC package. |
| `--venv PATH` | Use `PATH` for the environment and link the sample’s `.venv` to it; see
[Using an external virtual environment](#camera-streaming-external-venv). |
| `--wheel PATH` | Install a locally built `isaaccapture` wheel instead of resolving one from the index — for
developing Isaac Capture itself. |
| `--python VERSION` | Python for the venv that `setup` creates (default 3.12). An existing `.venv` keeps its
Python. |
| `--build-from-source` | Skip the package index and build `isaaccapture` from the surrounding checkout without
prompting — a full C++ / CUDA / Vulkan build (see
[Build from Source](../development/build_from_source/index.md)). |
For example, to use a wheel built from this checkout, run from the repository root. Name one
wheel: `install/wheels/` keeps earlier builds, and `--wheel` takes a single path. `X.Y` is as
in [step 4 of Build from source](../development/build_from_source/index.md#build-from-source-install-package), and both the wheel’s
`cp` tag and `--python` must match the build’s `ISAAC_TELEOP_PYTHON_VERSION` (3.11 by
default):
```bash
examples/camera_viz/camera_viz.sh setup --python 3.11 \
--wheel install/wheels/isaaccapture-X.Y+local-cp311-cp311-linux_x86_64.whl
```
### Using an external virtual environment
To reuse a Python 3.12 environment, run from the repository root:
```bash
examples/camera_viz/camera_viz.sh setup --venv /absolute/path/to/venv
```
Setup installs dependencies there and links `examples/camera_viz/.venv` to it. Move an existing
`.venv` directory aside first. The wrapper uses `.venv/bin/python` regardless of the active
shell environment; activation is optional. Add `--jetson` on Jetson.
### Jetson CUDA prerequisites
CuPy compiles GPU kernels at runtime using NVRTC and CUDA headers
([CuPy requirements](https://docs.cupy.dev/en/stable/install.html#cupy-always-raises-nvrtc-error-compilation-6)).
**If these components are already installed, skip this step.**
On JetPack 7.2.1 / CUDA 13.2, the [JetPack CUDA development package](https://docs.nvidia.com/jetson/agx-thor-devkit/user-guide/latest/setup_jetpack.html#install-specific-jetpack-components)
provides them. With the matching NVIDIA repositories configured:
```bash
sudo apt update
sudo apt install nvidia-cuda-dev
```
Use the CUDA toolkit matching your JetPack. `--jetson` configures library discovery. A separate `nvcc` compiler is needed for CUDA source builds, such as the native
RTP codec, rather than ordinary CuPy kernel execution.
### OAK-D USB permissions
OAK-D cameras need the Luxonis udev rule. Without it, `depthai` reports
`Insufficient permissions to communicate with X_LINK_UNBOOTED device` and cannot find the
camera. `setup` offers to install the rule when an OAK-D is attached and no rule covers it;
declining that optional step does not abort setup. To install it manually:
```bash
echo 'SUBSYSTEM=="usb", ATTRS{idVendor}=="03e7", MODE="0666"' | sudo tee /etc/udev/rules.d/80-movidius.rules
sudo udevadm control --reload-rules && sudo udevadm trigger
```
Then unplug and reconnect the camera.
## Command overview
After setup, run the following commands from `examples/camera_viz`. `CONFIG` is a YAML
path, such as `configs/replay.yaml`:
| Command | Purpose |
|------------------------------------------------|---------------------------------------------------------------------------------------------------------|
| `./camera_viz.sh run CONFIG [VIEWER_FLAGS]` | Run the viewer; flags after `CONFIG` are forwarded to
`python -m isaaccapture_examples.camera_viz`. |
| `./camera_viz.sh loopback CONFIG` | Run a local sender and receiver to test RTP. Requires `setup --with-rtp`. |
| `./camera_viz.sh deploy CONFIG [DEPLOY_FLAGS]` | Install the sender on a remote Jetson and start its systemd user service. |
| `./camera_viz.sh service-status` | Inspect the remote camera-streamer service. |
| `./camera_viz.sh service-logs` | Follow the remote camera-streamer logs. |
| `./camera_viz.sh service-restart` | Restart the remote camera-streamer service. |
`deploy` and `service-*` use the SSH credentials described in [Split mode — robot → workstation over RTP](#split-mode).
The `service-*` commands manage the robot’s RTP sender; CloudXR has separate
[service commands](#camera-cloudxr-runtime).
Run `.venv/bin/python -m isaaccapture_examples.camera_viz --help` for viewer and CloudXR
launcher flags.
## Web client for camera visualization
The default [Isaac Teleop Web Client](https://nvidia.github.io/IsaacCapture/client/main/) shows an in-XR control panel with connection information
and controls that are useful during development. To hide this panel for camera viewing, open
**Advanced settings → In-XR comfort** before connecting and set **Control panel when entering XR
(saved per teleop application)** to **Hide control panel**.
This preference is saved for the selected teleop application and takes effect when entering XR.
If already connected, leave and re-enter XR to apply it. Use the small **Show** control to reopen
the panel and **Hide** to dismiss it while the camera stream continues.
Follow the [headset connection steps](../teleop/quick_start.md#connect-quest-pico) for the server address,
certificate acceptance, and connection.
## First run — a recording, no camera required
The recorded-camera source (`type: video`) replays a video file through exactly the same
source → layer → Televiz path a live camera uses. It is the supported way to stream recorded
camera data, it needs no extra setup, and it is the quickest end-to-end check. A test clip ships
with the repo, and [configs/replay.yaml](https://github.com/NVIDIA/IsaacCapture/blob/main/examples/camera_viz/configs/replay.yaml)
already points at it. Fetch the clip with Git LFS if your checkout contains only its pointer:
```bash
git lfs pull --include="examples/camera_viz/test_data/recording.mp4"
```
Keep OpenCV installed for replay (`--no-v4l2` skips it). From the repository root:
```bash
cd examples/camera_viz
./camera_viz.sh run configs/replay.yaml # XR headset (default)
./camera_viz.sh run configs/replay.yaml --mode window # desktop window instead
```
In XR mode the viewer first brings up the CloudXR runtime (accept the EULA on first launch, or
pass `--accept-eula`). Open the printed client URL in your headset browser, accept the host’s
certificate, and click **Connect**, following [5. Connect an XR headset](../teleop/quick_start.md#connect-xr-headset). On Jetson Orin, select
**H.264** in the client’s **Video Codec** setting before connecting.
**You should see** the terminal report the session and the source coming up:
```default
camera_viz: source=local, mode=xr, xr=True, shapes=quad, 1 layer(s)
[video] opening...
[video] connected
[video] streaming
```
and the clip looping on a plane in the headset once it connects — or in a desktop window
(`mode=window, xr=False`) with the `--mode window` override, which starts no runtime.
### First-session checklist
With the default `replay.yaml`:
- **Playback:** one plane is visible and the clip loops.
- **Head movement:** small turns and leaning change your viewpoint; the plane stays anchored.
- **Lazy recentering:** look more than 45° away for about a second; the plane moves smoothly
back in front of you.
- **Image quality:** no freezing, flicker, torn regions, or unexpected colors while still or
moving. This mono clip should show the same source image in both eyes.
- **Controllers, if available:** right-stick click recenters; `A` changes lock mode;
`Y` restores the config.
- **Restart:** press `Ctrl+C`, rerun, and reconnect if needed; playback resumes.
In window mode, check playback, image quality, and restart. If a check fails, see
[Troubleshooting](#camera-streaming-troubleshooting).
### Replaying your own recording
Point `path` at any file OpenCV’s FFmpeg backend reads — mp4 / mkv / webm carrying H.264,
HEVC, AV1, and so on. The file is probed once at startup for its size and frame rate (a missing
or absurd rate falls back to 30 fps); a missing or unreadable file is a configuration error and
fails immediately instead of retrying like a camera would. A complete config:
```yaml
source: local
cameras:
- name: replay
enabled: true
type: video
path: ../test_data/recording.mp4 # required; relative to this YAML's directory
loop: true # false = hold the last frame at end of file
fps: 0 # 0 = the file's native rate
stereo: false # true = split a side-by-side recording into eyes
# width/height default to the file's native size (per eye when stereo)
display:
mode: xr # or: window
placements:
replay: { lock_mode: lazy, distance: 1.5 }
```
With `source: rtp`, `width`, `height`, and `fps` become required — the sender paces its
encode loop at `fps` and the receiver sizes its decoder from the config — and `stereo` is
rejected, since the sender needs per-eye streams. A mono recording is otherwise a fine capture
side for [split mode](#split-mode) and for `loopback`, which exercises the whole
encode → UDP → decode path with no camera attached.
## Supported sources
The source kind is selected by the `type` field of each entry in the YAML `cameras` list:
| `type:` | Notes |
|-------------|--------------------------------------------------------------------------------------------------------------------------------------------------------------------------------------------------------------------------------------------------------------------|
| `v4l2` | USB / UVC cameras — anything `v4l2-ctl --list-formats-ext` reports. |
| `oakd` | OAK-D RGB / LEFT / RIGHT; mono or `stereo: true`. Stereo ships GRAY8 over USB to halve
bandwidth and is broadcast to RGBA on the GPU; `stereo_rgb` keeps color. |
| `zed` | ZED 2 / Mini / X One; mono or `stereo: true` (per-eye SDK retrieve, zero-copy on the GPU). |
| `argus` | Jetson libargus cameras through CUDA EGLStream, including GMSL sensors exposed by
`nvargus-daemon`. Build setup with `--with-argus` first. |
| `video` | Recorded camera data — video-file replay (anything OpenCV’s FFmpeg backend reads). Loops
by default; `stereo: true` splits side-by-side recordings into eyes (viewer only). See
[First run — a recording, no camera required](#recorded-camera-streaming). |
| `synthetic` | Debugging tool — GPU-generated test pattern, no camera or file required. `stereo: true` adds
a `disparity_px` offset between the eyes. |
## Running with a real camera
Attach the camera to the machine that runs the viewer, keep `source: local` in the config, and
run with the matching config. First edit its device, resolution, and frame rate to match your
camera. In particular, `v4l2.yaml` defaults to a ZED Mini’s 2560×720 UVC mode; a regular webcam
needs values it supports (inspect them with `v4l2-ctl --list-formats-ext`):
```bash
./camera_viz.sh run configs/v4l2.yaml # or oakd.yaml / zed.yaml / argus_shw5g.yaml
```
**ZED Mini: UVC or SDK stereo.** In the 2560×720 UVC mode used by `v4l2.yaml`, the left
and right camera images are packed side by side. The sample displays that entire image on one
plane, with the same packed image in both headset eyes. For per-eye stereo, install ZED support
with `./camera_viz.sh setup --with-zed` and use `configs/zed.yaml` (`type: zed`,
`stereo: true`), which retrieves a separate image for each eye through the ZED SDK.
**You should see** the same startup lines as above with the camera’s tag (`[v4l2]`,
`[oakd]`, `[zed]`, `[argus]`) and the live feed. Multiple entries in the `cameras` list
render as one plane each.
### Jetson Argus / GMSL cameras
Argus support is for Jetson-local capture with minimum camera-to-display latency. It bypasses
`nvarguscamerasrc` and consumes Argus EGLStreams directly:
```text
nvargus-daemon -> libargus EGLStream -> CUDA YUV-to-RGBA -> camera_viz
```
Install with the Argus backend enabled on the Jetson:
```bash
examples/camera_viz/camera_viz.sh setup --with-argus --jetson
```
Use `nvargus_nvraw` to confirm the Argus sensor indices before editing the YAML:
```bash
/usr/sbin/nvargus_nvraw --lps
```
The repository includes [configs/argus_shw5g.yaml](https://github.com/NVIDIA/IsaacCapture/blob/main/examples/camera_viz/configs/argus_shw5g.yaml) for a SENSING SHW5G stereo pair on Jetson AGX
Thor. Its tested settings use independent Argus sessions for sensors `0` and `1`,
`repeat_capture: true` for lower request latency, `pair_emit_mode: both` to avoid duplicate
stereo submits, and `swap_uv: true` for the observed SHW5G color layout. Some SENSING driver
stacks also require running `nvargus-daemon` with `enableCamInfiniteTimeout=1`.
Other ready-to-edit configs include `realsense.yaml`, `synthetic.yaml`,
`synthetic_stereo.yaml`, `synthetic_xr_3up.yaml`, and `multi_camera.yaml` in
[configs/](https://github.com/NVIDIA/IsaacCapture/tree/main/examples/camera_viz/configs).
## Display modes
XR is the default: each camera renders as its own plane in the headset via the active OpenXR
runtime, and stereo sources (`stereo: true`) render true side-by-side stereo. Pass
`--mode window` (or set `display.mode: window` in the YAML) to render to a desktop window
instead — no headset or runtime needed; stereo shows the left eye.
In XR, how a plane follows the operator’s head is the per-camera `lock_mode` under
`display.placements.`:
| Mode | Behavior |
|----------|------------------------------------------------------------------------------------------------------------------------------------------------------------------------------------------------------------------------------------------|
| `world` | Placed once in front of you and stays put. |
| `head` | Follows your head every frame. Head-locked content updates its pose at application
rate, so it trails fast head motion by roughly a frame — expected for any head-locked
OpenXR layer; prefer `lazy` unless you need a true HUD. |
| `gimbal` | Follows your position but not your rotation: the surface stays pointed where you first
looked, walks with you, and turning your head looks around it. The natural mode for
wide cylinder feeds (a “virtual gimbal”). |
| `lazy` | World-locked, but re-snaps in front of you when you look away (default). |
Lazy-mode knobs live under `placements.`: `look_away_angle_deg`,
`reposition_distance`, `reposition_delay_s`, `transition_duration_s`.
### Controller bindings
In XR the controllers retune the view live, without editing the YAML and restarting. Quest and
Pico report these bindings identically. The right hand changes how the feed looks; the left,
what surface it is mapped onto:
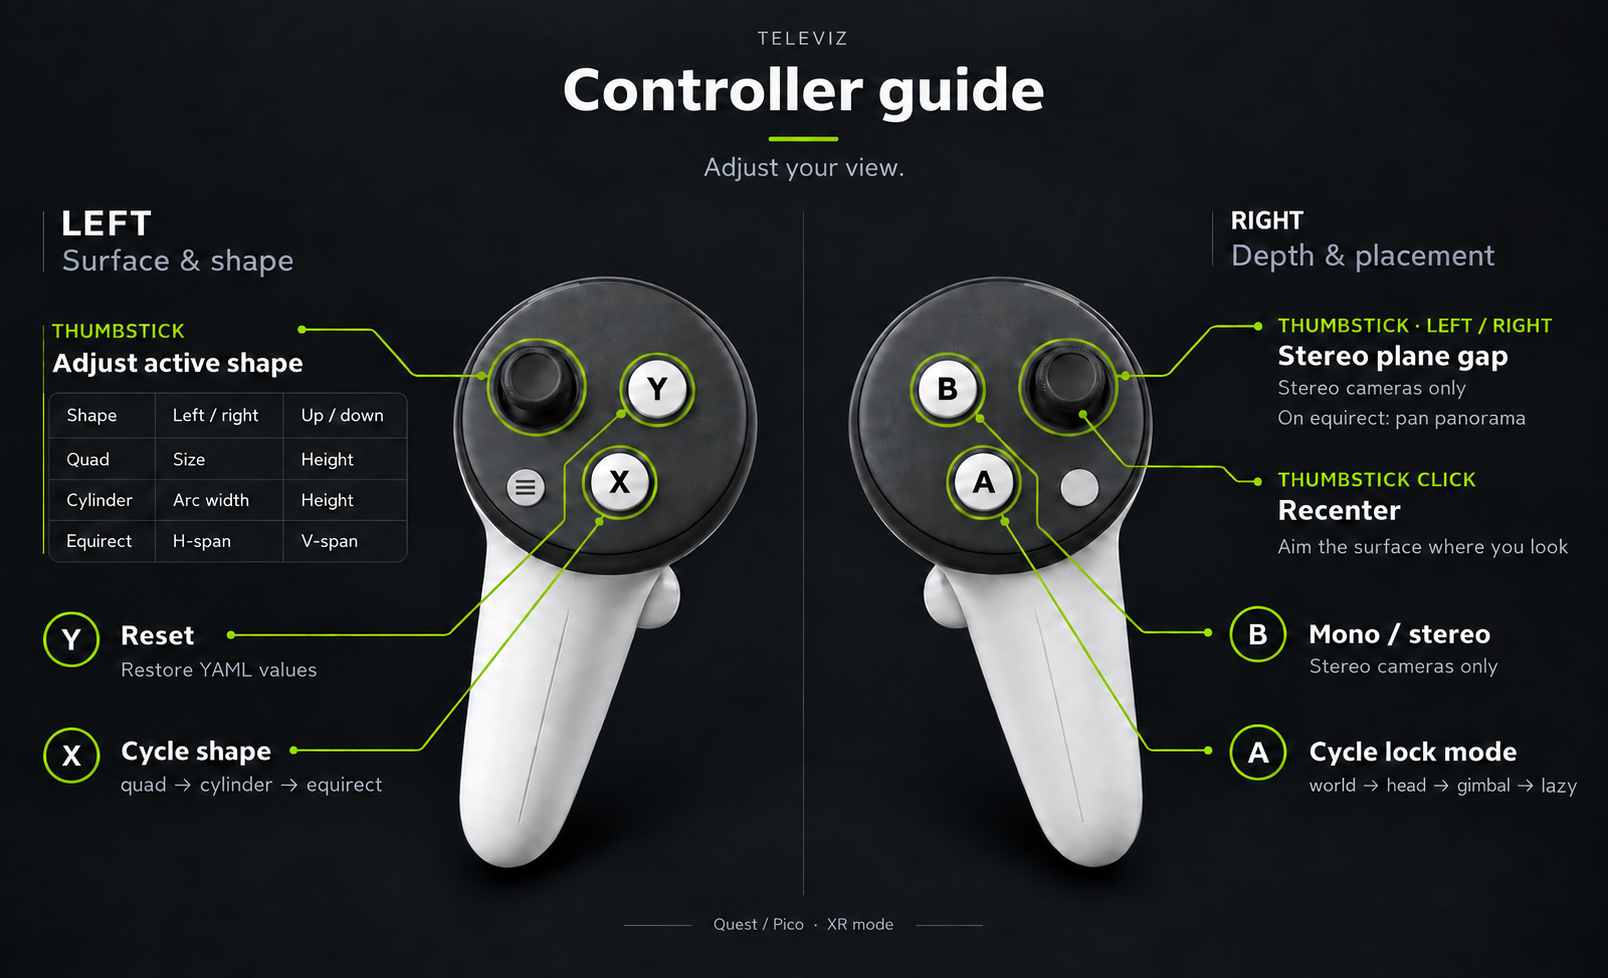
Bindings at a glance. The table below is the same thing in words.
| Input | Effect |
|-------------------|--------------------------------------------------------------------------------------------------------------------------------------------------------------------------------------------------------------------------------------------------------------------------------------------------------------------|
| Right stick ←/→ | Stereo plane gap — how far apart the two eyes’ planes sit
(`placements..stereo_plane_distance_cm`). Widening it pushes the scene back
instead of packing it into the space in front of the planes. Stereo cameras only; on
`equirect`, which has no gap to set, the same stick pans the panorama. |
| Right stick click | Recenter on your view: an `equirect` yaws so the middle of the panorama lands dead
ahead, and a placed surface re-snaps its anchor. |
| `A` | Cycle the lock mode: `world` → `head` → `gimbal` → `lazy`. |
| `B` | Toggle mono / stereo. Stereo cameras only. |
| `X` | Cycle the shape: `quad` → `cylinder` → `equirect`. |
| `Y` | Reset everything to the YAML values. |
| Left stick | Horizontal / vertical axes adjust `quad` size (preserving aspect ratio) / height,
`cylinder` arc width / height, and `equirect` horizontal / vertical span. |
Changes apply to every camera at once and appear both on the terminal status panel and on a
head-locked panel in the headset that auto-hides after about 2.5 seconds. Nothing is written
back to the YAML. Neither toggle reallocates: `B` sends the left frame to both eyes, and
`X` flips visibility between shapes built at startup. The two extra layers per camera cost
VRAM (reported at startup); `shape_switching: false` keeps only the configured shape.
Bindings, rates, and limits live under `display.controls`:
```yaml
display:
controls:
enabled: true # false disables the bindings
hud: true # false disables the in-headset readout
shape_switching: true # keep all three shapes resident for X
deadzone: 0.2 # stick rest-position tolerance
plane_distance_rate_cm_per_s: 2.0 # held-stick ramp rates
size_rate_m_per_s: 0.5
offset_rate_m_per_s: 0.5
angle_rate_deg_per_s: 40.0
```
Limits are `plane_distance_min_cm`, `plane_distance_max_cm`, `size_range_m`,
`offset_y_range_m`, `cylinder_angle_range_deg`, `equirect_h_range_deg`, and
`equirect_v_half_range_deg`. Defaults stay within what the layers accept; see
[configs/zed.yaml](https://github.com/NVIDIA/IsaacCapture/blob/main/examples/camera_viz/configs/zed.yaml) for a commented example.
A quad’s `distance` and a cylinder’s `cylinder_radius_m` stay YAML-only. Apparent size is
`2 * atan((width / 2) / distance)` and arc width is `radius * angle` (angle in radians),
so moving either surface farther away while enlarging it by the same factor preserves its
apparent size. The real distance to the surface still affects stereo depth.
### Stereo plane distance
A stereo layer draws each eye’s image on its own plane. `stereo_plane_distance_cm` sets
the gap between them:
```yaml
display:
placements:
zed:
distance: 1.0 # how far away the planes are, in meters
stereo_plane_distance_cm: 5.0 # how far apart they are, in centimeters
```
At zero both eyes share one plane, so the scene is packed into the space between you and
`distance`. Widening the gap pushes the scene back and lets it spread out. The value is
passed to the layer’s `stereo_baseline_mm` after multiplying by 10; the stick adjusts it in
0.1 cm steps. This is separate from the camera’s physical lens baseline, which is fixed in
hardware and determines the scene’s depth scale.
The HUD suggests a value using the plane distance and the headset’s measured IPD, shown
alongside the current value (for example, `5.0/5.2`). The suggestion is advisory; the stick
sets the value. Its ceiling is bounded by the measured IPD as well as the configured limit
to avoid **divergent parallax**: at a gap equal to your IPD the eyes’ rays are parallel;
beyond it they would have to splay outward. `B` sets the gap to zero in mono mode and
restores it when switching back to stereo.
The gap has no effect on the equirect sphere at its default infinite radius, so the right
stick pans that shape instead. Televiz also offers `stereo_convergence_deg`, a rotation-based
equivalent for curved layers that works at any radius. Live gap adjustment requires
`Layer.set_stereo_baseline_mm`; when using an older wheel without that method, the binding
disables itself with a notice while `A`, `B`, `X`, and `Y` remain available.
## Display surfaces
By default each camera renders on a flat plane, which suits normal-FOV feeds. Wide-FOV and
panoramic sources look better on a curved surface: set `shape` per camera under
`display.placements.`:
| Shape | Behavior |
|------------------|----------------------------------------------------------------------------------------------------------------------------------------------------------------------------------------------------------------------------------------------------------------------------------------------------------------------------------------------------------------------------------------------------------|
| `quad` (default) | Flat plane. All lock modes apply. |
| `cylinder` | Curved arc facing the operator, so the image stays at a constant viewing distance edge
to edge. `cylinder_radius_m` (default 2.0) sets that distance, `cylinder_angle_deg`
(default 90) the arc width. All lock modes apply (`head` = gaze-tracking curved
visor). |
| `equirect` | Full 360°×180° sphere around the operator, for equirectangular panorama / VR-video
sources. The middle of the texture points along `equirect_yaw_deg` (0 = the
direction the headset last recentered on, positive to the left), which is how a camera
mounted facing another way gets aimed. Lock modes don’t apply — the sphere is centred
on the operator and follows them everywhere. |
Curved shapes exist only in XR mode — the viewer exits with an error in window mode. Stereo
sources render per-eye textures on the same surface, and `stereo_baseline_mm` adds a per-eye
pose shift (no effect on the equirect sphere at its default infinite radius).
Surfaces are composited by the OpenXR runtime, which keeps them sharp under head motion and lets
CloudXR stream them efficiently (see
[OpenXR composition layers](../development/televiz.md#openxr-composition-layers)). For flat planes only,
`compositor: televiz` opts a camera back into Televiz’s built-in compositor. On Jetson Orin
(CloudXR experimental runtime), set `compositor: televiz` so the plane is not left black; see
Troubleshooting below. On the Televiz 2D API the same switch is
`openxr_composition = False` (see [Jetson Orin, XR](../development/televiz.md#orin-openxr-composition)).
### Aiming an equirect
The middle of the texture maps to the sphere pose’s **−z** direction and the middle row to
its horizon. With no rotation, that is the reference space’s forward direction — where the
headset faced when it last recentered. Aim a camera mounted facing another way with:
```yaml
display:
placements:
sky:
shape: equirect
equirect_yaw_deg: -90.0 # heading the middle of the feed points at
```
Positive yaw turns left. The right stick pans live, its click centers the panorama on your
view, and `Y` restores the YAML value. The status panel shows the heading in its `shape`
column (for example, `equirect +35°`). The sphere follows the operator; `lock_mode`,
`distance`, and `size` do not position it.
## CloudXR runtime flags
In XR mode the viewer attaches to the running CloudXR runtime, or starts one if none is
serving. Useful flags:
- `--accept-eula` — accept the CloudXR EULA non-interactively (first run only).
- `--cloudxr-device-profile PROFILE` — `NV_DEVICE_PROFILE` (default `Quest3`).
- `--no-host-client` — disable serving CloudXR.js at
`https://:48322/client/`. Only applies when this run starts the
service; stop and restart the service to change hosting.
When the viewer starts a CloudXR service with hosting enabled (the default;
`--no-host-client` disables it), it prints the local `/client/` URL. Open
`https://:48322/client/` on the headset, accept the self-signed certificate, and
click **CONNECT**. If the service was started with `--no-host-client`, use the GitHub Pages
client URL reported by `service status` instead. To inspect or stop an already-running
service, activate the example venv (or any environment with `isaaccapture`) and run:
```default
python -m isaaccapture.cloudxr.service status
python -m isaaccapture.cloudxr.service stop
```
Run `.venv/bin/python -m isaaccapture_examples.camera_viz --help` for the rest (install dir,
env-config file, WSS proxy toggle).
Runtime settings themselves are declared in the config rather than exported. The viewer ships
defaults (pose wait off, runtime foveation on), and `display.cloudxr` overrides them per
deployment — list only what you want to change:
```yaml
display:
cloudxr:
NV_DEVICE_PROFILE: apple-vision-pro
NV_ENABLE_POSE_WAIT: null # null drops a viewer default
```
The viewer writes these to a generated `--cloudxr-env-config` file, which outranks the process
environment — so a value left in your shell (for example after sourcing
`~/.cloudxr/run/cloudxr.env`, as `--no-launch-cloudxr-runtime` suggests) cannot silently
override the config, and neither can it override `--cloudxr-device-profile`. Booleans are
written in the lowercase spelling the runtime’s parser recognises; the launcher-computed keys
(`XR_RUNTIME_JSON`, `NV_CXR_RUNTIME_DIR`, `NV_CXR_OUTPUT_DIR`, `XRT_NO_STDIN`) are
rejected by name. Passing `--cloudxr-env-config` yourself takes precedence over the generated
file.
An unknown variable name warns with a suggestion before the runtime launches, and is passed
through regardless — the runtime has more settings than the viewer lists. To confirm what the
runtime resolved, read the settings dump at the top of the newest
`~/.cloudxr/logs/cxr_server.*.log`.
Monado’s `DEBUG_GET_ONCE` options, including `NV_ENABLE_POSE_WAIT`, do not appear in that
dump. Add `XRT_PRINT_OPTIONS: true` under `display.cloudxr` when starting the runtime to
log each option as `NAME=value (raw)`; `(nil)` means no value arrived.
`NV_DEVICE_PROFILE` selects device matching, not just tuning. Non-Quest profiles use
separate-frame packing and do not support the packed-frame path required by
client-reconstructed streaming.
## Split mode — robot → workstation over RTP
Split mode runs the capture side on the robot (the `camera_streamer` module) and ships RTP H.264 to
the viewer on the workstation (`source: rtp`).
#### WARNING
Split mode is **not recommended in most cases**. It exists for one situation: the cameras are
on the robot, but Isaac Capture runs on a workstation, so the frames must be streamed to where
Isaac Capture is running. That costs a full extra encode/decode hop — NVENC on the robot, UDP,
NVDEC on the workstation — so whenever a camera can attach directly to the machine running
Isaac Capture, run direct mode instead. Wired networks only: there is no retransmit or FEC — one lost packet corrupts one
frame until the next IDR (default every 5 s).
In split mode every camera entry must pin `width`, `height`, and `fps` in the YAML — the
receiver sizes its decoder from the config, not from the wire.
The workstation needs the RTP dependencies, which `setup` does not install by default — re-run
it with `--with-rtp` if you provisioned for direct mode first. The robot side is handled by
`deploy`, which implies the flag.
Set `source: rtp` in the config, export the robot/streaming credentials once per shell, then
deploy the sender and run the viewer:
```bash
export REMOTE_HOST=10.0.0.5 REMOTE_USER=nvidia
read -s REMOTE_PASSWORD && export REMOTE_PASSWORD # only if not using SSH keys (bash)
export STREAMING_HOST=10.0.0.42 # workstation IP
./camera_viz.sh deploy configs/v4l2.yaml # full deploy + systemd unit on the robot
./camera_viz.sh run configs/v4l2.yaml # viewer on the workstation
```
Use SSH keys, or install `sshpass` locally and export `REMOTE_PASSWORD` as above. The
remote commands also accept `--host` and `--user` in place of `REMOTE_HOST` and
`REMOTE_USER`. `--password` overrides `REMOTE_PASSWORD`, but reading the password
interactively keeps it out of shell history and the command line.
`deploy` performs these steps:
1. Sync the example to `~/camera_viz` on the robot with `rsync`.
2. Run `scripts/_install_deps.sh --sender-only --jetson` through `ssh -t`. Add
`--with-argus` to `deploy` to build the Argus source on the robot. Missing system packages
or JetPack CUDA wiring prompt for approval on the robot.
3. Render `~/.config/systemd/user/camera-streamer.service`. `--streaming-host IP` (or
`STREAMING_HOST`) injects `--host IP` into its `ExecStart` without changing the YAML.
4. Enable lingering once with `sudo loginctl enable-linger`, then enable the user service and
restart it, so a redeploy replaces a streamer that is already running.
`--no-service` stops after source sync and dependency installation. In that case,
`--streaming-host` does not configure a running sender; pass `--host` when starting
`python -m isaaccapture_examples.camera_viz.camera_streamer` manually. The sender retries
across unplug, SDK errors, and network blips. Operate the installed unit with:
```bash
./camera_viz.sh service-status
./camera_viz.sh service-logs
./camera_viz.sh service-restart
```
### Loopback
Loopback is a testing / debugging aid, not a deployment mode: `./camera_viz.sh loopback
configs/v4l2.yaml` runs the sender and viewer together on `127.0.0.1` — the quickest way to
smoke-test the RTP path on one machine. It also works camera-free with a mono `type: video`
entry: `./camera_viz.sh loopback configs/replay.yaml` runs as shipped.
Two things to know when running it:
- Use the config that matches the attached camera. `configs/v4l2.yaml` is a ZED Mini template
(`/dev/video0`, 2560x720); on any other camera it fails to open and the viewer reports
`submit/s 0.0`. For a RealSense, run `configs/realsense.yaml`.
- `loopback` does not forward `--mode`, so it opens in the YAML’s `display.mode` (`xr` by
default). Set `display.mode: window` in the YAML for a desktop window.
## Configuration
A single YAML drives both capture and visualization. Each entry in the `cameras` list becomes
its own plane (and, in split mode, its own RTP port). Abbreviated:
```yaml
source: local | rtp
streaming:
host: 192.168.1.100 # workstation IP (overridden at deploy time)
encoder: auto | native | gstreamer
cameras:
- name: cam
enabled: true
type: v4l2 # v4l2 | oakd | zed | argus | video | synthetic
width: 2560 # video: optional — defaults to the file's size
height: 720 # (required when source: rtp)
fps: 30
stereo: false # zed / oakd / argus / video / synthetic — per-eye capture + SBS in XR
path: clip.mp4 # video only — file to replay, relative to this YAML
loop: true # video only — rewind at end of file
sensor_id: 0 # argus mono only; use sensor_id_left/right for stereo
sensor_mode: 0 # argus only
repeat_capture: true # argus only — use repeat requests when supported
pair_emit_mode: both # argus independent stereo only: either | both
rtp:
port: 5000 # left eye when stereo
port_right: 5001 # required when stereo + source: rtp
bitrate_mbps: 15
# gop: 150 # default fps*5
# gpu_id: 0 # multi-GPU pin
display:
mode: xr | window # default: xr
window: { width, height }
xr:
near_z: 0.05 # default
far_z: 100.0 # default
system_wait_seconds: -1 # default; wait forever (0 fails fast)
clear_color: [r, g, b, a]
placements:
cam:
lock_mode: lazy # world | head | lazy | gimbal
distance: 1.5
offset_x: 0.0
offset_y: 0.0
# size: [w_m, h_m]
# stereo_plane_distance_cm: 0 # gap between the eyes' planes
# shape: quad # quad | cylinder | equirect (cylinder/equirect are XR-only)
# equirect_yaw_deg: 0.0 # equirect: heading the middle of the feed points at
# compositor: openxr # openxr (default) | televiz — quads only
# cylinder_radius_m: 2.0
# cylinder_angle_deg: 90
```
See the [configs/](https://github.com/NVIDIA/IsaacCapture/tree/main/examples/camera_viz/configs) directory for a complete, commented
YAML per source kind.
## Status panel
In a terminal, `camera_viz` redraws a snapshot in place:
```text
camera_viz xr · local · 1 camera
────────────────────────────────────────────────────────────────────
render 58.0 fps (target 72) missed 0 gpu 2.1 ms
camera shape lock eyes size m height m planes cm submit/s
zed cylinder lazy stereo 1.00 +0.00 5.0/5.2 64.0
headset IPD 63 mm
stereo planes: 5.0 cm · suggested: 5.2 cm · IPD: 63 mm
```
`planes cm` shows the current and suggested stereo gaps. `-` means a field does not
apply; equirect has no gap, and window mode has no XR controls. While the panel is live,
control messages and source lifecycle lines pass through it so they do not disrupt the
layout. When stderr is not a terminal (for example, piped output or a deployed systemd unit),
the viewer prints one line every five seconds with the same numbers.
## Troubleshooting
- **The XR session fails to create** — check `~/.cloudxr/logs/cxr_server.*.log` and
`~/.cloudxr/logs/runtime_worker_stderr.log` (`runtime_stderr.log` with
`ISAACCAPTURE_LOGGING=off`) for the startup failure.
`XR_ERROR_FORM_FACTOR_UNAVAILABLE`
(-35) means the runtime is up but no headset has clicked CONNECT yet; XR mode waits
according to `display.xr.system_wait_seconds` (default `-1` to wait
indefinitely; `0` fails fast; positive values wait that many seconds;
override with `--xr-wait`). Pass `--mode window` to
render to a desktop window instead (no runtime involved).
- **No window appears over SSH** — `--mode window` needs a local display; run on the machine
you’re sitting at, or use a video-capable remote desktop.
- **“video source: no such file”** — relative `path:` values resolve against the YAML’s
directory (`configs/`), not the directory you launched from.
- **A source fails asking for CuPy / CUDA** — check the matching CUDA headers, NVRTC, and
`/usr/local/cuda` target ([Jetson CUDA prerequisites](#camera-streaming-jetson-cuda) on Jetson), then rerun setup.
`nvidia-smi` checks driver support, not installed headers. To test GPU execution,
run from `examples/camera_viz` and expect `CuPy kernel check passed`:
```bash
.venv/bin/python scripts/check_cuda.py
```
- **Python cannot find dependencies** — use the sample’s `.venv/bin/python`, or select an
environment with [setup –venv](#camera-streaming-external-venv).
`No module named 'isaaccapture_examples'` means the sample is not installed in that
environment; rerun `./camera_viz.sh setup` (with the same `--venv`, if you used one).
- **No video on Orin.** When the CloudXR runtime runs on Jetson Orin, set
**Video Codec** to **H.264** in the CloudXR web client. See
[5. Connect an XR headset](../teleop/quick_start.md#connect-xr-headset).
- **Black camera plane on Orin** — with the CloudXR experimental runtime on Orin, the default
OpenXR compositor shows the camera plane but leaves its contents black. Under the camera’s
`display.placements` entry, set `compositor: televiz` (quads only). The same feed displays
correctly with this workaround:
```yaml
display:
placements:
cam:
compositor: televiz
```
- **\`\`type: argus\`\` is unavailable** — rerun setup on the Jetson with `--with-argus` and confirm
the Jetson Multimedia API Argus headers exist under `/usr/src/jetson_multimedia_api/argus`.
- **Argus lists sensors but capture stalls** — confirm the selected `sensor_id` values with
`/usr/sbin/nvargus_nvraw --lps`. Some GMSL driver stacks need `nvargus-daemon` configured
with `enableCamInfiniteTimeout=1`.
- **Split mode renders nothing** — check the sender is up (`./camera_viz.sh service-status`),
`$STREAMING_HOST` was the workstation’s IP at deploy time, and UDP ports (default 5000+)
aren’t firewalled.
- **CUDA kernel errors** — rerun the setup check from `examples/camera_viz`. It prints
CUDA diagnostics on failure; a driver version from `nvidia-smi` does not identify
the installed toolkit:
```bash
.venv/bin/python scripts/check_cuda.py
```
- **Thor: \`\`CUDA_ERROR_NO_BINARY_FOR_GPU\`\`** — an older NVRTC compiler can produce kernels
incompatible with Thor. Select your JetPack’s CUDA 13.x toolkit and rerun setup. As a
temporary workaround for CuPy kernels, try:
```bash
CUPY_COMPILE_WITH_PTX=1 ./camera_viz.sh run configs/synthetic.yaml
```
This lets the driver compile the kernel for the GPU ([CuPy PTX option](https://docs.cupy.dev/en/stable/reference/environment.html#cupy-compile-with-ptx)).
- **Not sure which side is stuck?** — set `verbose: true` at the top of the YAML for periodic
per-source breadcrumbs on both ends.
## How it works
The sample is organized so that capture, transport, and visualization are cleanly separated, with
Televiz as the compositor at the end of the chain:
```text
camera_viz/
├── camera_viz.sh — CLI: setup / loopback / run / deploy / service-*
├── configs/ — one YAML per source kind
├── test_data/ — sample replay clip (Git LFS)
├── python/isaaccapture_examples/camera_viz/
│ ├── camera_viz.py — receiver / viewer (drives a Televiz VizSession)
│ ├── camera_streamer.py — robot-side RTP sender (per-camera supervisor)
│ ├── config.py — YAML parsing and validation
│ ├── display.py — VizSession + one layer per surface
│ ├── cloudxr_env.py — display.cloudxr → runtime env file
│ ├── cuda_env.py — applies the CUDA_PATH setup records
│ ├── dashboard.py — terminal status panel
│ ├── controls/ — XR controller bindings, shapes, stereo geometry, HUD
│ ├── pipeline/ — source ABC + threaded runner
│ ├── placements/ — XR lock-mode strategies (world / head / lazy / gimbal)
│ ├── sources/ — V4L2 / OAK-D / ZED / Argus / video replay / synthetic / rtp_h264
│ ├── transports/ — RTP sender + receiver (native + GStreamer)
│ ├── argus/ — optional Jetson libargus / CUDA EGLStream pybind module
│ └── codec/ — native NVENC / NVDEC pybind module
└── scripts/
├── _install_deps.sh — installer (setup + deploy)
└── camera-streamer.service.in — systemd unit template
```
- **Sources** ([sources/](https://github.com/NVIDIA/IsaacCapture/tree/main/examples/camera_viz/python/isaaccapture_examples/camera_viz/sources)) implement a common source ABC and
hand frames to a threaded runner in [pipeline/](https://github.com/NVIDIA/IsaacCapture/tree/main/examples/camera_viz/python/isaaccapture_examples/camera_viz/pipeline). Each
source produces GPU frames where possible — e.g. the ZED source uses `retrieve_image(MEM.GPU)` so
BGRA8 stays in VRAM and a CUDA kernel channel-swaps into contiguous RGBA with no host round-trip.
The optional Argus source consumes Jetson EGLStreams with CUDA and publishes RGBA buffers without a
CPU readback.
- **The viewer** ([camera_viz.py](https://github.com/NVIDIA/IsaacCapture/blob/main/examples/camera_viz/python/isaaccapture_examples/camera_viz/camera_viz.py)) creates a
`VizSession` and adds one `QuadLayer` per enabled camera, then submits each frame to its layer
and calls `render()` once per frame. Stereo cameras submit both eyes.
- **Transport** ([transports/](https://github.com/NVIDIA/IsaacCapture/tree/main/examples/camera_viz/python/isaaccapture_examples/camera_viz/transports)) carries the split mode:
an RTP H.264 sender on the robot and a receiver on the workstation, with a native NVENC/NVDEC codec
module ([codec/](https://github.com/NVIDIA/IsaacCapture/tree/main/examples/camera_viz/python/isaaccapture_examples/camera_viz/codec)) or a GStreamer fallback.
- **Placement** ([placements/](https://github.com/NVIDIA/IsaacCapture/tree/main/examples/camera_viz/python/isaaccapture_examples/camera_viz/placements)) holds the XR lock-mode
strategies. Placement is application policy — Televiz only renders a layer at whatever pose the app
sets each frame.
## Sharing the XR session with TeleopSession
Only one OpenXR session is allowed per process, so when this sample runs alongside teleoperation the
`VizSession` owns the session and hands its handles to `TeleopSession` / `DeviceIOSession`,
which then skip creating their own. The viewer builds the session with the trackers’ required
extensions and forwards the handles through `TeleopSessionConfig.oxr_handles`:
```python
cfg.required_extensions = DeviceIOSession.get_required_extensions(trackers)
viz_session = televiz.VizSession.create(cfg)
config = TeleopSessionConfig(
app_name="MyApp",
pipeline=pipeline,
oxr_handles=OpenXRSessionHandles(*viz_session.get_oxr_handles()),
)
```
See the *Sharing the XR session* section of [Televiz](../development/televiz.md) for the full pattern
(imports, frame loop, and how the two sessions’ lifecycles relate), and
[Teleop Session](../teleop/teleop_session.md) for the `TeleopSession` side.
`viz_session.get_oxr_handles()` returns `(instance, session, space, proc_addr)` as raw
`uint64` values, or `None` outside `isaaccapture.viz.DisplayMode.kXr`.
## Next steps
- [Connect a live camera](#camera-streaming-live-camera) or
[replay your own recording](#recorded-camera-streaming).
- [Adjust the view](#camera-streaming-controls) and save placement settings in YAML.
- [Stream from a robot](#split-mode) when capture and viewing run on separate machines.
- [Share the XR session with teleoperation](../development/televiz.md#sharing-the-xr-session) and map inputs with
the [retargeting interface](retargeting/index.md).
- Control a physical SO-101 and record demonstrations with
[LeRobot](../integrations/lerobot/data_collection_real.md).
- Teleoperate a simulated SO-101 and record demonstrations with
[Isaac Lab](../integrations/lerobot/data_collection_sim.md).