Using NVIDIA NIM for LLMs
Running Examples on NIM for LLMs
NVIDIA NIM for LLMs provides the enterprise-ready approach for deploying large language models (LLMs).
If you are approved for early access to NVIDIA NeMo Microservices, you can run the examples with NIM for LLMs.
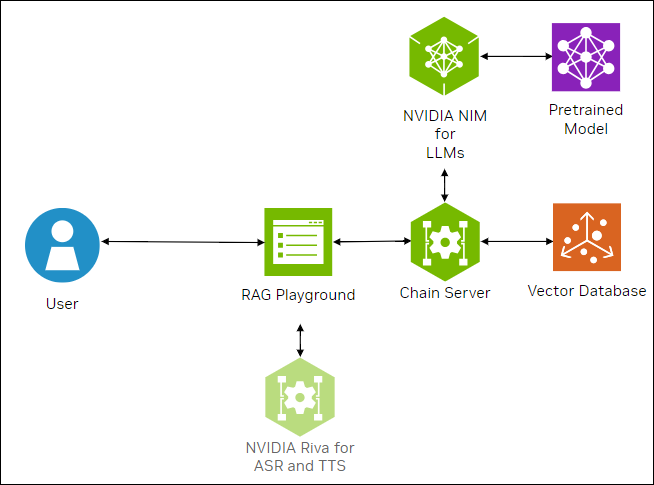
The following figure shows the sample topology:
The sample chat bot web application communicates with the chain server. The chain server sends inference requests to a local NVIDIA NIM for LLMs microservice.
Optionally, you can deploy NVIDIA Riva. Riva can use automatic speech recognition to transcribe your questions and use text-to-speech to speak the answers aloud.

Prerequisites
You have early access to NVIDIA NeMo Microservices.
Clone the Generative AI examples Git repository using Git LFS:
$ sudo apt -y install git-lfs
$ git clone git@github.com:NVIDIA/GenerativeAIExamples.git
$ cd GenerativeAIExamples/
$ git lfs pull
A host with an NVIDIA A100, H100, or L40S GPU.
Verify NVIDIA GPU driver version 535 or later is installed and that the GPU is in compute mode:
$ nvidia-smi -q -d compute
Example Output
==============NVSMI LOG==============

Timestamp                                 : Sun Nov 26 21:17:25 2023
Driver Version                            : 535.129.03
CUDA Version                              : 12.2

Attached GPUs                             : 1
GPU 00000000:CA:00.0
    Compute Mode                          : Default
If the driver is not installed or below version 535, refer to the NVIDIA Driver Installation Quickstart Guide.
Install Docker Engine and Docker Compose. Refer to the instructions for Ubuntu.
Install the NVIDIA Container Toolkit.
Refer to the installation documentation.
When you configure the runtime, set the NVIDIA runtime as the default:
$ sudo nvidia-ctk runtime configure --runtime=docker --set-as-default
If you did not set the runtime as the default, you can reconfigure the runtime by running the preceding command.
Verify the NVIDIA container toolkit is installed and configured as the default container runtime:
$ cat /etc/docker/daemon.json
Example Output
{
    "default-runtime": "nvidia",
    "runtimes": {
        "nvidia": {
            "args": [],
            "path": "nvidia-container-runtime"
        }
    }
}
Run the
nvidia-smicommand in a container to verify the configuration:$ sudo docker run --rm --runtime=nvidia --gpus all ubuntu nvidia-smi -L
Example Output
GPU 0: NVIDIA A100 80GB PCIe (UUID: GPU-d8ce95c1-12f7-3174-6395-e573163a2ace)
Optional: Enable NVIDIA Riva automatic speech recognition (ASR) and text to speech (TTS).
To launch a Riva server locally, refer to the Riva Quick Start Guide.
In the provided
config.shscript, setservice_enabled_asr=trueandservice_enabled_tts=true, and select the desired ASR and TTS languages by adding the appropriate language codes toasr_language_codeandtts_language_code.After the server is running, assign its IP address (or hostname) and port (50051 by default) to
RIVA_API_URIindeploy/compose/compose.env.
Alternatively, you can use a hosted Riva API endpoint. You might need to obtain an API key and/or Function ID for access.
In
deploy/compose/compose.env, make the following assignments as necessary:export RIVA_API_URI="<riva-api-address/hostname>:<port>" export RIVA_API_KEY="<riva-api-key>" export RIVA_FUNCTION_ID="<riva-function-id>"
Build and Start the Containers
Create a
model-cachedirectory to download and store the modelsmkdir -p model-cache
In the Generative AI Examples repository, edit the
deploy/compose/compose.envfile.Add or update the following environment variables.
# full path to the `model-cache` directory
# NOTE: This should be an absolute path and not relative path
export MODEL_DIRECTORY="/path/to/model/cache/directory/"

# IP of system where llm is deployed.
export APP_LLM_SERVERURL="nemollm-inference:8000"

# Name of the deployed embedding model (NV-Embed-QA)
export APP_EMBEDDINGS_MODELNAME="NV-Embed-QA"

export APP_EMBEDDINGS_MODELENGINE=nvidia-ai-endpoints

# IP of system where embedding model is deployed.
export APP_EMBEDDINGS_SERVERURL="nemollm-embedding:9080"    # Or ranking-ms:8080 for the reranking example.

# GPU for use by Milvus
export VECTORSTORE_GPU_DEVICE_ID=<free-gpu-id>
...
Build the Chain Server and RAG Playground containers:
$ docker compose \
    --env-file deploy/compose/compose.env \
    -f deploy/compose/rag-app-text-chatbot.yaml \
    build chain-server rag-playground
Avoid GPU memory errors by assigning a GPU to the Chain Server. Update
device_idsin thechain-serverservice ofdeploy/compose/rag-app-text-chatbot.yamlmanifest to specify a unique GPU ID. You can specify a different Docker Compose file, such asdeploy/compose/rag-app-multiturn-chatbot.yaml.deploy: resources: reservations: devices: - driver: nvidia device_ids: ['<free-gpu-id>'] capabilities: [gpu]
Start the Chain Server and RAG Playground:
$ docker compose \
    --env-file deploy/compose/compose.env \
    -f deploy/compose/rag-app-text-chatbot.yaml \
    up -d --no-deps chain-server rag-playground
The
-dargument starts the services in the background and the--no-depsargument avoids starting the JupyterLab server.Start the NIM for LLMs and NeMo Embedding Microservices containers.
Export the
NGC_API_KEYenvironment variable that the containers use to download models from NVIDIA NGC:export NGC_API_KEY=M2...The NGC API key has a different value than the NVIDIA API key that the API catalog examples use.
Start the containers:
$ DOCKER_USER=$(id -u) docker compose \
    --env-file deploy/compose/compose.env \
    -f deploy/compose/docker-compose-nim-ms.yaml \
    --profile llm-embedding \
    up -d
Start the Milvus vector database:
$ docker compose \
    --env-file deploy/compose/compose.env \
    -f deploy/compose/docker-compose-vectordb.yaml \
    --profile llm-embedding \
    up -d milvus
Confirm the containers are running:
$ docker ps --format "table {{.ID}}\t{{.Names}}\t{{.Status}}"
Example Output
CONTAINER ID   NAMES                  STATUS
256da0ecdb7b   rag-playground         Up About an hour
2974aa4fb2ce   chain-server           Up About an hour
f96712f57ff8   <nim-llms>             Up About an hour
5e1cf74192d6   <embedding-ms>         Up About an hour
5be2b57bb5c1   milvus-standalone      Up About an hour
a6609c22c171   milvus-minio           Up About an hour
b23c0858c4d4   milvus-etcd            Up About an hour
Stopping the Containers
Stop the vector database:
$ docker compose -f deploy/compose/docker-compose-vectordb.yaml --profile llm-embedding down
Stop the NIM for LLMs and NeMo Retriever Embedding Microservices:
$ DOCKER_USER=$(id -u) docker compose \
    --env-file deploy/compose/compose.env \
    -f deploy/compose/docker-compose-nim-ms.yaml \
    --profile llm-embedding \
    down
Stop and remove the application containers:
$ docker compose --env-file deploy/compose/compose.env -f deploy/compose/rag-app-text-chatbot.yaml down
Stop the NIM for LLMs container and NeMo Retriever Embedding container by pressing Ctrl+C in each terminal.