Using Local GPUs for a Q&A Chatbot
Example Features
This example deploys a developer RAG pipeline for chat Q&A and serves inferencing with the NeMo Framework Inference container.
This example uses a local host with an NVIDIA A100, H100, or L40S GPU.
Model |
Embedding |
Framework |
Description |
Multi-GPU |
TRT-LLM |
Model Location |
Triton |
Vector Database |
|---|---|---|---|---|---|---|---|---|
llama-2 |
UAE-Large-V1 |
LlamaIndex |
QA chatbot |
NO |
YES |
Local Model |
YES |
Milvus |
llama-2 |
UAE-Large-V1 |
LlamaIndex |
QA chatbot |
NO |
YES |
Local Model |
YES |
pgvector |
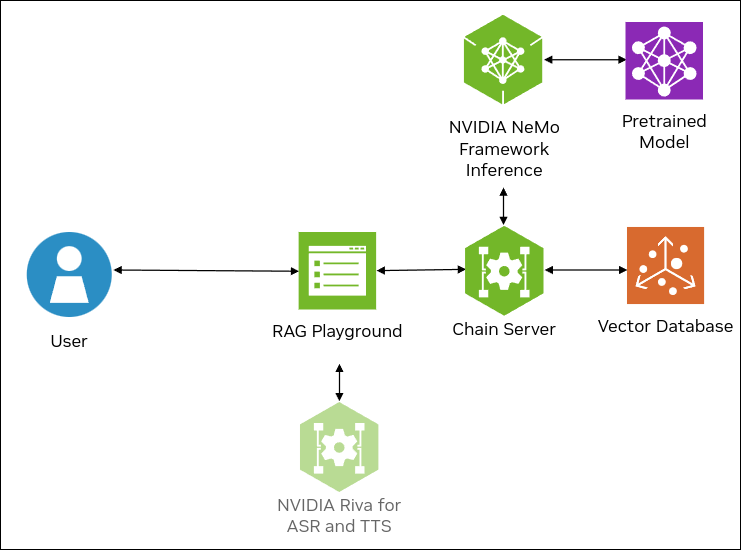
The following figure shows the sample topology:
The sample chat bot web application communicates with the local chain server.
The local chain server sends inference requests to NVIDIA Triton Inference Server (TIS). TIS uses TensorRT-LLM and NVIDIA GPUs with the LLama 2 model for generative AI.
The sample chat bot supports uploading documents to create a knowledge base. The uploaded documents are parsed by the chain server and embeddings are stored in the vector database, Milvus or pgvector. When you submit a question and request to use the knowledge base, the chain server retrieves the most relevant documents and submits them with the question to TIS to perform retrieval-augumented generation.
Optionally, you can deploy NVIDIA Riva. Riva can use automatic speech recognition to transcribe your questions and use text-to-speech to speak the answers aloud.
Prerequisites
Clone the Generative AI examples Git repository using Git LFS:
$ sudo apt -y install git-lfs
$ git clone git@github.com:NVIDIA/GenerativeAIExamples.git
$ cd GenerativeAIExamples/
$ git lfs pull
A host with an NVIDIA A100, H100, or L40S GPU.
Verify NVIDIA GPU driver version 535 or later is installed and that the GPU is in compute mode:
$ nvidia-smi -q -d compute
Example Output
==============NVSMI LOG==============

Timestamp                                 : Sun Nov 26 21:17:25 2023
Driver Version                            : 535.129.03
CUDA Version                              : 12.2

Attached GPUs                             : 1
GPU 00000000:CA:00.0
    Compute Mode                          : Default
If the driver is not installed or below version 535, refer to the NVIDIA Driver Installation Quickstart Guide.
Install Docker Engine and Docker Compose. Refer to the instructions for Ubuntu.
Install the NVIDIA Container Toolkit.
Refer to the installation documentation.
When you configure the runtime, set the NVIDIA runtime as the default:
$ sudo nvidia-ctk runtime configure --runtime=docker --set-as-default
If you did not set the runtime as the default, you can reconfigure the runtime by running the preceding command.
Verify the NVIDIA container toolkit is installed and configured as the default container runtime:
$ cat /etc/docker/daemon.json
Example Output
{
    "default-runtime": "nvidia",
    "runtimes": {
        "nvidia": {
            "args": [],
            "path": "nvidia-container-runtime"
        }
    }
}
Run the
nvidia-smicommand in a container to verify the configuration:$ sudo docker run --rm --runtime=nvidia --gpus all ubuntu nvidia-smi -L
Example Output
GPU 0: NVIDIA A100 80GB PCIe (UUID: GPU-d8ce95c1-12f7-3174-6395-e573163a2ace)
Optional: Enable NVIDIA Riva automatic speech recognition (ASR) and text to speech (TTS).
To launch a Riva server locally, refer to the Riva Quick Start Guide.
In the provided
config.shscript, setservice_enabled_asr=trueandservice_enabled_tts=true, and select the desired ASR and TTS languages by adding the appropriate language codes toasr_language_codeandtts_language_code.After the server is running, assign its IP address (or hostname) and port (50051 by default) to
RIVA_API_URIindeploy/compose/compose.env.
Alternatively, you can use a hosted Riva API endpoint. You might need to obtain an API key and/or Function ID for access.
In
deploy/compose/compose.env, make the following assignments as necessary:export RIVA_API_URI="<riva-api-address/hostname>:<port>" export RIVA_API_KEY="<riva-api-key>" export RIVA_FUNCTION_ID="<riva-function-id>"
Download the Llama 2 Model and Weights
Fill out Meta’s Llama request access form.
Select the Llama 2 & Llama Chat checkbox.
After verifying your email, Meta will email you a download link.
Clone the Llama repository:
$ git clone https://github.com/facebookresearch/llama.git
$ cd llama/
Run the
download.shscript. When prompted, specify13B-chatto download the llama-2-13b-chat model:$ ./download.sh Enter the URL from email: < https://download.llamameta.net/...> Enter the list of models to download without spaces (7B,13B,70B,7B-chat,13B-chat,70B-chat), or press Enter for all: 13B-chat
Copy the tokenizer to the model directory.
$ mv tokenizer* llama-2-13b-chat/
$ ls llama-2-13b-chat/
Example Output
checklist.chk consolidated.00.pth consolidated.01.pth params.json tokenizer.model tokenizer_checklist.chk
Build and Start the Containers
In the Generative AI Examples repository, edit the
deploy/compose/compose.envfile.Specify the absolute path to the model location, model architecture, and model name.
# full path to the local copy of the model weights
# NOTE: This should be an absolute path and not relative path
export MODEL_DIRECTORY="/path/to/llama/llama-2-13b_chat/"

# the architecture of the model. eg: llama
export MODEL_ARCHITECTURE="llama"

# the name of the model being used - only for displaying on frontend
export MODEL_NAME="Llama-2-13b-chat"
...
From the root of the repository, build the containers:
$ docker compose --env-file deploy/compose/compose.env -f deploy/compose/rag-app-text-chatbot.yaml build
Start the containers:
$ docker compose --env-file deploy/compose/compose.env -f deploy/compose/rag-app-text-chatbot.yaml up -d
NVIDIA Triton Inference Server can require 5 minutes to start. The
-dflag starts the services in the background.Example Output
✔ Network nvidia-rag              Created
✔ Container notebook-server       Started
✔ Container llm-inference-server  Started
✔ Container chain-server          Started
✔ Container rag-playground        Started
Start the Milvus vector database:
$ docker compose --env-file deploy/compose/compose.env -f deploy/compose/docker-compose-vectordb.yaml up -d milvus
Example Output
✔ Container milvus-minio       Started
✔ Container milvus-etcd        Started
✔ Container milvus-standalone  Started
Confirm the containers are running:
$ docker ps --format "table {{.ID}}\t{{.Names}}\t{{.Status}}"
Example Output
CONTAINER ID   NAMES                  STATUS
256da0ecdb7b   rag-playground         Up 48 minutes
2974aa4fb2ce   chain-server           Up 48 minutes
4a8c4aebe4ad   notebook-server        Up 48 minutes
5be2b57bb5c1   milvus-standalone      Up 48 minutes (healthy)
ecf674c8139c   llm-inference-server   Up 48 minutes (healthy)
a6609c22c171   milvus-minio           Up 48 minutes (healthy)
b23c0858c4d4   milvus-etcd            Up 48 minutes (healthy)
Stopping the Containers
Stop the vector database:
$ docker compose -f deploy/compose/docker-compose-vectordb.yaml down
Stop and remove the application containers:
$ docker compose --env-file deploy/compose/compose.env -f deploy/compose/rag-app-text-chatbot.yaml down
Next Steps
Run the sample Jupyter notebooks to learn about optional features.