Quickstart
Install sflow
Using an AI coding agent? Paste this into Claude Code, Codex, Cursor or any other coding agent. It installs sflow, checks that it runs, and installs the sflow skills for that agent (the agent setup runbook is what it follows):
Set up sflow for me by following
https://raw.githubusercontent.com/NVIDIA/nv-sflow/main/docs-site/agents-src/setup.md
step by step, then tell me what you installed and where.
By hand:
mkdir -p sflow_workspace && cd sflow_workspace
curl -LsSf https://astral.sh/uv/install.sh | sh
uv venv --python python3
source .venv/bin/activate
uv pip install nv-sflow
sflow --help
sflow --version   # or: sflow -V — print version + runtime/build details
Coming from v0.3.1 or earlier? The distribution is now
nv-sflowon PyPI:pip install nv-sflow, or runsflow upgradetwice (GitHub build first, then PyPI). Neverpip install sflow— that name on pypi.org is an unrelated project.
If curl is unavailable (e.g. on some locked-down clusters), install uv via pip instead:
pip install uv
Optional extras enable features that pull in extra dependencies:
pip install 'nv-sflow[s3]'        # S3 artifact/result uploads (boto3)
pip install 'nv-sflow[monitor]'   # PNG charts for the hardware monitor
One-Minute Mindset
sflow lets you describe a multi-step workflow in a single YAML file and run it on any compute backend — your laptop, a Slurm cluster, a Docker host, or a Kubernetes cluster — without rewriting scripts.
Core ideas:
| Concept | What it does | Example |
|---|---|---|
| Backend | Declares where tasks run. Swap one line to move between local, slurm, docker, and kubernetes. | type: slurm, partition: gpu |
| Operator | Declares how a task's script is launched. Each backend has a default (local → bash, Slurm → srun). Define named operators to preset flags and reuse them across tasks. | type: srun, ntasks: 4 |
| Variable | A named value reusable everywhere — scripts, resource counts, backend config. Override from the CLI with --set. | NUM_GPUS: 8 |
| Task & DAG | Each task is a unit of work with a script. depends_on wires them into a directed graph so sflow runs them in the right order. | depends_on: [train] |
| Probe | A readiness or failure check attached to a task. Downstream tasks wait until the probe passes. Built-ins: TCP port, HTTP endpoint, log pattern match. | type: tcp_port, port: 8080 |
| Resource placement | Topology-aware: sflow assigns nodes and GPUs automatically after allocation, packing tasks contiguously to respect node boundaries. Assigned resources are exposed as variables. | ${{ backends.slurm_cluster.nodes[0].ip_address }} |
Why not just write a bash script? A bash script hard-wires node names, GPU indices, and execution order. With sflow you declare what you want; it handles allocation, node discovery, GPU assignment, dependency ordering, log collection, and retries — the same YAML works locally for debugging and on Slurm for production.
This guide teaches sflow in three parts:
- Part I: Learn the Basics Locally – Write workflows, build DAGs, add variables — no cluster needed
- Part II: Run on Slurm – Take the same config to a real HPC cluster
- Part III: Run on Kubernetes – Take the same config to a Kubernetes cluster
This quickstart covers local (Part I), slurm (Part II), kubernetes (Part III) and multi-host Docker (Part IV). The same YAML moves between them by swapping the backend block. See Backends for every field.
Part I: Learn the Basics Locally
Start here to learn sflow concepts without needing a Slurm cluster.
1. Start with a Plain-Text Config
The fastest way to learn sflow is to start with hardcoded values — no variables, no expressions. Get the workflow logic right first.
version: "0.1"

workflow:
  name: wf
  tasks:
    - name: hello
      script:
        - echo hello
Validate and run:
sflow run --file sflow.yaml --dry-run   # validate first
sflow run --file sflow.yaml --tui       # run with TUI
Default output structure:
./sflow_output/<run_id>/: per-run root directory./sflow_output/<run_id>/<task_name>/: per-task directory (stdout/stderr go to<task_name>.log)
2. Build a DAG with depends_on
Add multiple tasks and wire them with depends_on. Start with plain text — hardcode everything:
version: "0.1"

workflow:
  name: training_pipeline
  tasks:
    - name: prepare_data
      script:
        - echo "Downloading cifar10..."
        - echo "cifar10" > ${SFLOW_WORKFLOW_OUTPUT_DIR}/dataset.txt

    - name: preprocess
      depends_on: [prepare_data]
      script:
        - test -f ${SFLOW_WORKFLOW_OUTPUT_DIR}/dataset.txt
        - echo "encoded_data ok" > ${SFLOW_WORKFLOW_OUTPUT_DIR}/encoded.txt

    - name: train
      depends_on: [preprocess]
      script:
        - test -f ${SFLOW_WORKFLOW_OUTPUT_DIR}/encoded.txt
        - echo "checkpoint for tiny-transformer" > ${SFLOW_WORKFLOW_OUTPUT_DIR}/checkpoint.pt

    - name: evaluate_on_dataset1
      depends_on: [train]
      script:
        - test -f ${SFLOW_WORKFLOW_OUTPUT_DIR}/checkpoint.pt
        - echo "accuracy=0.99 dataset=dataset1" > ${SFLOW_TASK_OUTPUT_DIR}/metrics.txt

    - name: evaluate_on_dataset2
      depends_on: [train]
      script:
        - test -f ${SFLOW_WORKFLOW_OUTPUT_DIR}/checkpoint.pt
        - echo "accuracy=0.88 dataset=dataset2" > ${SFLOW_TASK_OUTPUT_DIR}/metrics.txt

    - name: export_model
      depends_on: [evaluate_on_dataset1, evaluate_on_dataset2]
      script:
        - test -f ${SFLOW_WORKFLOW_OUTPUT_DIR}/evaluate_on_dataset1/metrics.txt
        - test -f ${SFLOW_WORKFLOW_OUTPUT_DIR}/evaluate_on_dataset2/metrics.txt
        - echo "exported tiny-transformer" > ${SFLOW_WORKFLOW_OUTPUT_DIR}/model.onnx
Always validate first, then run:
sflow run --file pipeline.yaml --dry-run
sflow run --file pipeline.yaml --tui
Visualize the DAG without running:
sflow visualize --file pipeline.yaml --format mermaid
3. Extract Variables for Reusability
Once the plain-text config works, identify values that you'd want to change between runs
and extract them into variables. This makes the config reusable without editing the YAML each time.
Before (hardcoded):
    - name: train
      script:
        - echo "checkpoint for tiny-transformer" > ${SFLOW_WORKFLOW_OUTPUT_DIR}/checkpoint.pt
After (parameterized):
variables:
  MODEL_NAME:
    description: "Model to train"
    value: tiny-transformer

workflow:
  tasks:
    - name: train
      script:
        - echo "checkpoint for ${MODEL_NAME}" > ${SFLOW_WORKFLOW_OUTPUT_DIR}/checkpoint.pt
Now you can override the value from the CLI without touching the file:
sflow run -f pipeline.yaml --set MODEL_NAME=large-transformer --tui
Variables can be used in two ways:
- In YAML fields (resolved before execution):
${{ variables.MODEL_NAME }} - In scripts (as env var at runtime):
${MODEL_NAME}
Here's the full parameterized version (or get it via sflow sample self_contained/local/dag):
version: "0.1"

variables:
  MODEL_NAME:
    description: "Model to train"
    value: tiny-transformer

workflow:
  name: quickstart_dag
  tasks:
    - name: prepare_data
      script:
        - echo "prepare_data start"
        - echo "model=${{ variables.MODEL_NAME }}" > ${SFLOW_WORKFLOW_OUTPUT_DIR}/dataset.txt

    - name: preprocess
      depends_on: [prepare_data]
      script:
        - test -f ${SFLOW_WORKFLOW_OUTPUT_DIR}/dataset.txt
        - echo "encoded_data ok" > ${SFLOW_WORKFLOW_OUTPUT_DIR}/encoded.txt

    - name: train
      depends_on: [preprocess]
      script:
        - test -f ${SFLOW_WORKFLOW_OUTPUT_DIR}/encoded.txt
        - echo "checkpoint for ${MODEL_NAME}" > ${SFLOW_WORKFLOW_OUTPUT_DIR}/checkpoint.pt

    - name: evaluate_on_dataset1
      depends_on: [train]
      script:
        - test -f ${SFLOW_WORKFLOW_OUTPUT_DIR}/checkpoint.pt
        - echo "accuracy=0.99 dataset=dataset1" > ${SFLOW_TASK_OUTPUT_DIR}/metrics.txt

    - name: evaluate_on_dataset2
      depends_on: [train]
      script:
        - test -f ${SFLOW_WORKFLOW_OUTPUT_DIR}/checkpoint.pt
        - echo "accuracy=0.88 dataset=dataset2" > ${SFLOW_TASK_OUTPUT_DIR}/metrics.txt

    - name: export_model
      depends_on: [evaluate_on_dataset1, evaluate_on_dataset2]
      script:
        - test -f ${SFLOW_WORKFLOW_OUTPUT_DIR}/evaluate_on_dataset1/metrics.txt
        - test -f ${SFLOW_WORKFLOW_OUTPUT_DIR}/evaluate_on_dataset2/metrics.txt
        - echo "exported ${MODEL_NAME}" > ${SFLOW_WORKFLOW_OUTPUT_DIR}/model.onnx
Plain text first, variables second. Start every new workflow with hardcoded values.
Once it runs successfully, extract the values you want to change into variables.
This makes debugging much easier — you know the recipe works before adding abstraction.
4. Validate Only (Dry-Run)
sflow run --file sflow.yaml --dry-run
Dry-run does not create output directories/files. It prints the execution plan and computed output paths.
5. Explore More Local Capabilities
The local backend is enough to try several sflow features before touching a cluster. Copy any of these with sflow sample <name> (each writes ./<basename>.yaml in the current directory — e.g. sflow sample self_contained/local/result_parsing writes ./result_parsing.yaml):
| Capability | Sample | What it shows |
|---|---|---|
| Result parsing | self_contained/local/result_parsing | Parse metrics from a log/JSON into result.json (see Results) |
| Storage uploads | self_contained/local/storage_upload, self_contained/local/storage_upload_all | Ship logs/results to a storage target such as S3 (see Uploads) |
| Workflow monitor | self_contained/local/monitor | Sample hardware utilization during a run and (optionally) render charts (see Monitor) |
sflow sample self_contained/local/monitor
sflow run -f monitor.yaml
Part II: Slurm Cluster
Take the same workflow concepts to a real HPC cluster. Make sure you have already installed sflow (see Install sflow above).
1. Prepare a Slurm Workflow
How it works (Slurm example):
Start with a plain-text config — hardcode your actual cluster values. No variables yet.
version: "0.1"

backends:
  - name: slurm_cluster
    type: slurm
    default: true
    account: "your_slurm_account"
    partition: "your_slurm_partition"
    time: "00:10:00"
    nodes: 1
    gpus_per_node: 8

workflow:
  name: wf
  tasks:
    - name: slurm_task
      script:
        - echo hello
Notes:
- Update
account/partition/time/nodesto match your cluster. - If you're already inside a Slurm allocation,
sflowwill reuse it; otherwise it will callsallocfirst. gpus_per_nodeis used for sflow resource planning and GPU index assignment; it does not add a Slurm allocation flag.- The backend also supports
extra_argsto pass arbitrary flags tosalloc:
backends:
  - name: slurm_cluster
    type: slurm
    default: true
    account: "your_slurm_account"
    partition: "your_slurm_partition"
    time: "01:00:00"
    nodes: 2
    gpus_per_node: 8
    extra_args:
      - "--exclusive"
      - "--gpus-per-node=8"
      - "--segment=8"
Once the plain-text config works, you can extract account, partition, nodes, etc. into variables (same pattern as Part I step 4) to make it reusable across clusters.
You can also use sflow sample to get starter workflows with variables already set up:
sflow sample --list
sflow sample self_contained/slurm/dynamo_trtllm_disagg
2. Operators & srun — How Your Script Actually Runs
On a Slurm backend the default operator is srun. sflow takes your task's script: lines and wraps them into:
srun [flags from operator config] bash -c "<your script lines>"
Operator config fields map directly to srun flags, so you never have to hand-craft srun commands:
| Operator config | srun flag | Purpose |
|---|---|---|
ntasks | --ntasks | Number of task slots |
ntasks_per_node | --ntasks-per-node | Tasks per node |
gpus_per_task | --gpus-per-task | GPUs per task slot |
cpus_per_task | --cpus-per-task | CPU cores per task |
nodes | --nodes | Node count for this step |
container_image | --container-image | Pyxis container (enroot) |
mpi | --mpi | MPI type (e.g. pmix) |
extra_args | (pass-through) | Any other srun flag |
extra_args is a list that passes arbitrary srun flags not covered by the named fields:
operators:
  - name: custom_worker
    type: srun
    ntasks_per_node: 1
    extra_args:
      - --exclusive
      - --mem-per-gpu=80G
      - --container-image=nvcr.io/nvidia/pytorch:24.05-py3
      - --container-mounts=/data:/data:ro
You can define named operators once and reference them by name in tasks — or override individual fields per task:
operators:
  - name: gpu_worker
    type: srun
    ntasks_per_node: 1
    gpus_per_task: 1
    container_image: nvcr.io/nvidia/pytorch:24.05-py3

workflow:
  tasks:
    - name: train
      operator: gpu_worker          # uses the preset above
      script:
        - torchrun train.py

    - name: inference
      operator:                     # inline override
        name: gpu_worker
        ntasks: 8                   # override just this field
      script:
        - python infer.py
Without sflow, the equivalent train task would require you to manually write:
srun --jobid=$SLURM_JOB_ID --nodes=1 --ntasks-per-node=1 --gpus-per-task=1 \
     --container-image=nvcr.io/nvidia/pytorch:24.05-py3 \
     bash -c "torchrun train.py"
sflow builds this command for you from the declarative config.
3. Run on Slurm (Interactive)
Before running, make sure you have updated the workflow YAML for your environment:
- Slurm settings: set
accountandpartitionto values valid on your cluster - Model paths: update any model or data paths to locations accessible from your compute nodes
- Container images: if the workflow uses a container operator, update the image tag to the version you need
- Extra args: Some clusters require
--gpus-per-nodewhen requesting GPU partitions. Add it explicitly in backendextra_args; sflow does not infer or add that Slurm flag fromgpus_per_node.
Validate first with a dry-run to catch config errors without allocating nodes:
sflow run --file sflow.yaml --dry-run
Once validation passes, launch the workflow:
sflow run --file sflow.yaml --tui
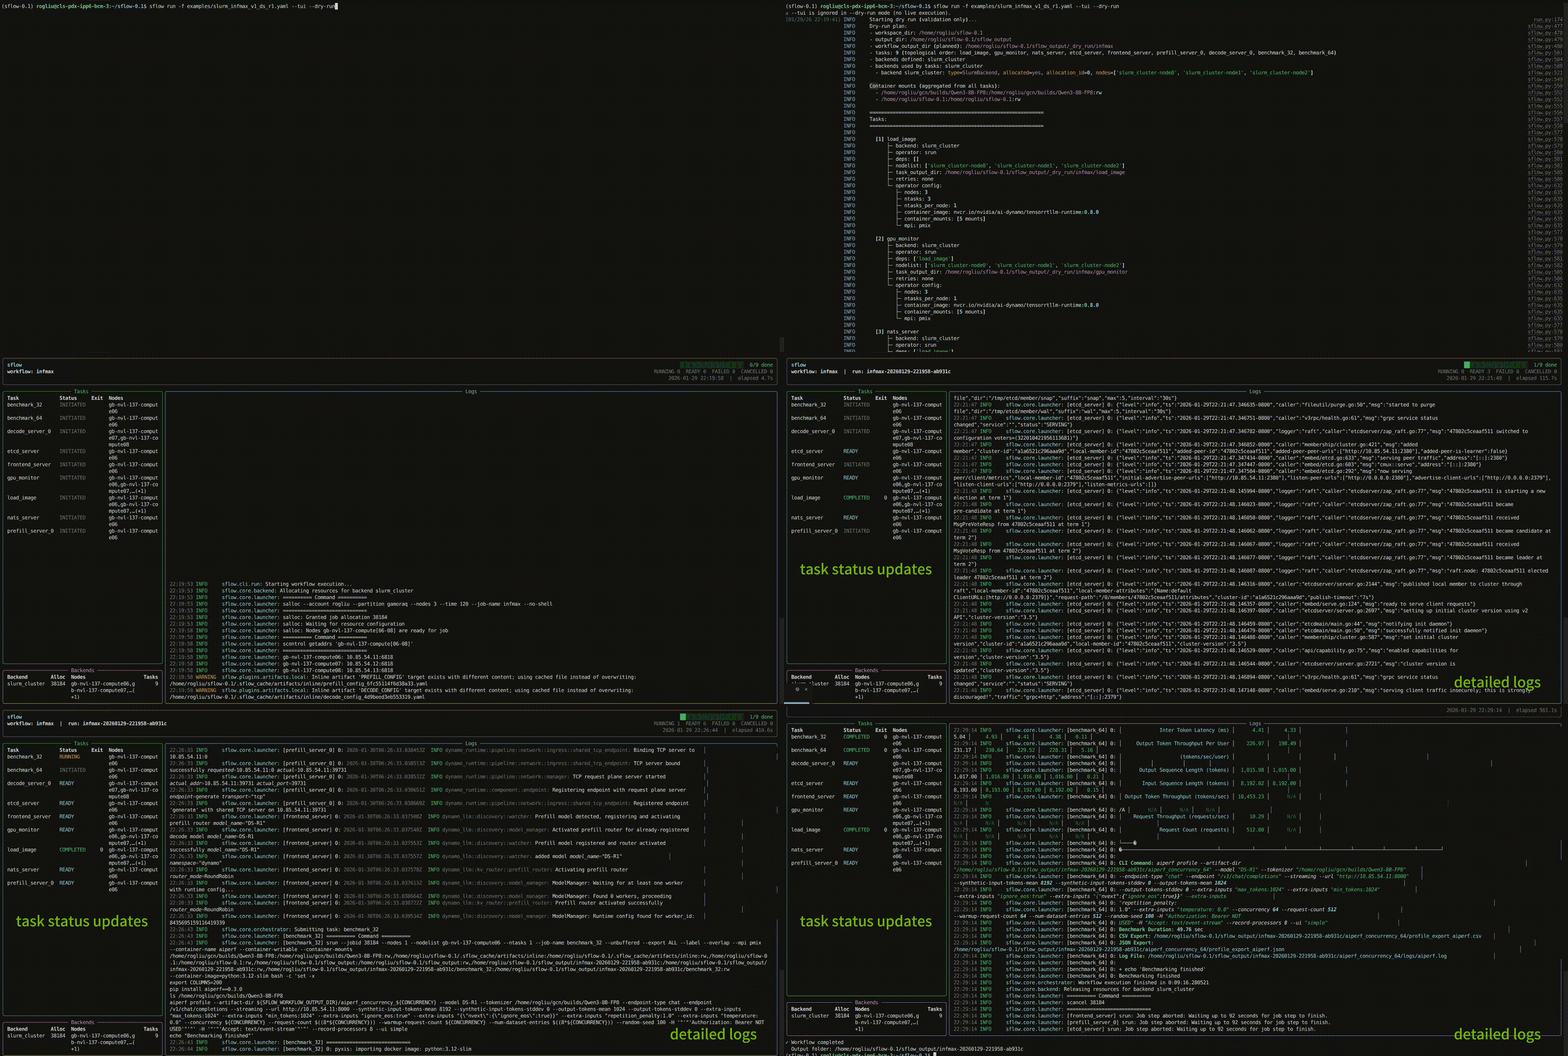
The TUI shows:
- Left: task status table + backend allocation summary
- Right: auto-tail logs (timestamp + level + module/logger)
For headless mode (automated jobs), run without --tui:
sflow run --file sflow.yaml
If your workflow pulls images from a private registry (e.g. nvcr.io), you need to configure enroot credentials on the cluster before running. Create or edit ~/.config/enroot/.credentials:
machine nvcr.io login $oauthtoken password <your-ngc-api-key>
Replace the machine/credentials for whichever registry your images come from. Without this file, srun --container-image will fail to pull private images.
4. Batch Mode: Fire-and-Forget Slurm Jobs
For long-running or production workflows, sflow batch generates a complete sbatch script with proper environment setup and job submission. This is the recommended way to run production workloads.
Why Use Batch Mode?
- Fire-and-forget: Submit the job and disconnect; it runs headlessly
- Automatic environment setup: Creates/activates a Python venv on compute nodes, this solves the python and lib difference often seen in clusters (e.g., login vs compute nodes)
- Dry-run validation: Validates the workflow before running to fail early
- Portable scripts: Generated scripts can be saved, reviewed, and resubmitted
Basic Usage
Generate an sbatch script to stdout:
sflow batch --file workflow.yaml
Save to a file:
sflow batch --file workflow.yaml --sbatch-path run_workflow.sh
Generate and submit immediately:
sflow batch --file workflow.yaml --sbatch-path run_workflow.sh --submit
Add extra slurm flags if required when submitting jobs in some cluster:
sflow batch --file workflow.yaml --sbatch-path run_workflow.sh -e '--exclusive' -e '--gpus-per-node=8' -e '--segment=8'
Full Example with Slurm Options
sflow batch \
  --file sglang_server_client.yaml \
  --partition gpu \
  --account myaccount \
  --time 02:00:00 \
  --nodes 2 \
  --gpus-per-node 4 \
  --job-name my-inference-job \
  --sbatch-path run_inference.sh \
  --submit
Note:
--gpus-per-node(-G) sets the cluster topology for sflow's resource planning (derived from the config's backend when omitted). It does NOT add a#SBATCH --gpus-per-nodedirective. If your cluster requires that directive, add it via-e '--gpus-per-node=4'.
With Variable Overrides
Override workflow variables at submission time:
sflow batch \
  --file workflow.yaml \
  --set NUM_GPUS=8 \
  --set MODEL_NAME=llama-70b \
  --sbatch-path run.sh
Per-Job Virtual Environment
By default each Slurm job creates its own fresh, disposable venv on the compute node
(.sflow_venv-<job id>/) using the node's system python3, so it always matches the node
architecture (e.g. x86 login node vs arm64 compute node) and is removed when the job exits.
Pass --sflow-venv-path to change the parent directory it is created under (e.g. a
shared-filesystem path instead of node-local scratch):
sflow batch \
  --file workflow.yaml \
  --sflow-venv-path /shared/scratch/sflow-venvs \
  --sbatch-path run.sh
What the Generated Script Does
- Sets sbatch directives: job name, output/error files, partition, account, time limit
- Creates a fresh per-job venv: builds
.sflow_venv-<job id>/on the compute node with sflow installed, then removes it on exit (override the parent dir with--sflow-venv-path) - Runs dry-run validation: Catches configuration errors before the full run
- Executes the workflow: Runs
sflow runwith all provided options
Common Options
| Option | Description |
|---|---|
--file, -f | Path to the sflow.yaml workflow file |
--sbatch-path, -o | Write sbatch script to file (required for --submit) |
--submit | Submit the job immediately after generating |
--partition, -p | Slurm partition |
--account, -A | Slurm account |
--time | Time limit (e.g., 02:00:00) |
--nodes, -N | Number of nodes for the sbatch job |
--gpus-per-node, -G | Number of GPUs per node |
--job-name, -J | Slurm job name (default: sflow) |
--set, -s | Override variable (can be repeated) |
--artifact, -a | Override artifact URI (can be repeated) |
--sflow-venv-path | Parent dir for the fresh per-job venv (default: compute-node-local scratch) |
Monitoring Batch Jobs
After submission, monitor your job with standard Slurm commands:
squeue -u $USER           # Check job status
scancel <job_id>          # Cancel a job
tail -f sflow_output/<job_id>-sflow-submit.out  # Follow output logs
Part III: Kubernetes Cluster
Run the same workflow concepts on a Kubernetes cluster. Make sure you have already installed sflow (see Install sflow above), and that the machine running sflow has working cluster access — sflow shells out to your local kubectl.
How it works (Kubernetes example):
A few things differ from Slurm on the Kubernetes backend today:
sflow runis interactive (attached) only — there is nosflow batch/ fire-and-forget mode on K8S yet, so the driver process must stay connected for the whole run.monitor:blocks are skipped (no in-cluster hardware collector yet).- Tested on vanilla bare-metal Kubernetes and Google GKE; other environments are untested.
1. Prepare a Kubernetes Workflow
Two things differ from the Slurm setup:
- The workload image lives on the operator, not the backend. The
kubernetesbackend declares where (namespace, nodes, GPUs); the operator declares the containerimageto run. - There is no default operator on Kubernetes. Unlike
local→bashorslurm→srun, every K8S task must name an explicitk8s(ork8s_mpi) operator that carries animage.
Start with the smallest working recipe — CPU-only (gpus_per_node: 0). Grab it with sflow sample self_contained/kubernetes/hello_world:
version: "0.1"

backends:
  - name: k8s
    type: kubernetes
    default: true
    namespace: default
    nodes: 1
    gpus_per_node: 0

operators:
  - name: k8s_op
    type: k8s
    image: ubuntu:22.04       # the workload image lives on the operator

workflow:
  name: kubernetes_hello_world
  tasks:
    - name: hello
      operator: k8s_op
      script:
        - echo "Hello from Kubernetes"
Common backend fields:
| Backend field | Default | Purpose |
|---|---|---|
namespace | — | Namespace to run in; must already exist. One namespace per backend (use separate backends for separate namespaces). |
nodes | — | Number of nodes to reserve for the workflow. |
gpus_per_node | derived from node capacity | GPUs per node; checked against real GPU capacity at pre-flight. Set 0 for CPU-only. |
scheduling | device_plugin | How GPUs are requested: device_plugin (NVIDIA gpu-operator, nvidia.com/gpu) or dra (K8s 1.34+, WIP). |
gpu_resource_name | nvidia.com/gpu | Override the device-plugin resource name (e.g. MIG nvidia.com/mig-1g.5gb). |
host_network | true | Pod shares the node network namespace (pod IP == node IP). Privileged; turn off on CNI-routable clusters. |
host_ipc | false | Share the node IPC namespace + /dev/shm for cross-pod CUDA IPC over NVLink. Privileged; opt-in. |
volumes | — | Mount existing PVCs / emptyDir scratch into every task pod. PVCs must already exist — sflow references them, it does not create them. |
See Backends for the full field list, including DRA/MIG, RDMA, and Multi-Node NVLink options.
2. Operators on Kubernetes
Each task's script: lines run inside a pod built from the operator's container image. There are two K8S operator types:
| Operator | Use for |
|---|---|
k8s | Standard single/multi-node container tasks. Required field: image. |
k8s_mpi | mpirun-launched workloads — inherits every k8s field and adds an mpi: block; sflow injects the SSH/hostfile/sshd glue for you. |
Frequently-used k8s operator fields:
| Operator field | Default | Purpose |
|---|---|---|
image | (required) | Container image for the task's pod. |
image_pull_secrets | — | Secret name(s) for pulling from a private registry (e.g. nvcr.io). |
service_account | — | Pod service account (RBAC / cloud workload identity). |
run_as_root | false | Run the container as root. |
shm_size | node RAM | Shared-memory (/dev/shm) size. The K8s 64Mi default segfaults multi-GPU NCCL/MPI jobs — set e.g. 64Gi. |
cpu / memory | — | Resource requests (cpu_limit / memory_limit set limits). |
env | — | Extra environment variables for the pod. |
You can define named operators once and reference them by name in tasks, or override fields per task — the same pattern shown for Slurm operators in Part II.
3. Connect to the Cluster and Run
Cluster credentials are passed as CLI flags on sflow run, never in the YAML — so the same recipe stays cluster-agnostic:
| Flag | Default |
|---|---|
--kubeconfig PATH | $KUBECONFIG, else ~/.kube/config |
--kube-context NAME | current context |
--kube-namespace NAME | the backend's namespace |
Validate first with a dry-run to catch config errors without touching the cluster:
sflow run --file hello_world.yaml --dry-run
Then run against your cluster (add --tui for the live status/log view):
sflow run -f hello_world.yaml \
  --kubeconfig ~/.kube/prod.config \
  --kube-context prod-east \
  --kube-namespace ml-team \
  --tui
Before allocating, sflow runs a non-mutating RBAC pre-flight (kubectl auth can-i …) for the pod/configmap/secret/log operations it needs and fails fast with an actionable message if a permission is missing. Only namespaced permissions it truly depends on are hard gates — denied cluster-scoped reads (namespaces, nodes) just warn, so a namespaced ServiceAccount works out of the box. Bypass the check entirely with SFLOW_SKIP_K8S_PREFLIGHT=1.
Prerequisites:
- Working
kubectlaccess from the machine running sflow. - The target namespace already exists, with RBAC to create/delete pods, configmaps, and secrets and to read pod logs and nodes.
- For GPUs: the NVIDIA gpu-operator installed (
device_plugin, the default), or K8s 1.34+ withnvidia-dra-driver-gpu(dra, WIP). - Any PVCs referenced under
volumes:already exist in the namespace. For quick debugging on a cluster that lacks them,sflow run --kube-skip-pvcdrops PVC-backed volumes.
For images from a private registry (e.g. nvcr.io), create a Kubernetes pull secret in your namespace and reference it from the operator:
kubectl create secret docker-registry ngc-secret \
  --docker-server=nvcr.io \
  --docker-username='$oauthtoken' \
  --docker-password=<your-ngc-api-key> \
  -n ml-team
operators:
  - name: gpu_worker
    type: k8s
    image: nvcr.io/nvidia/pytorch:24.05-py3
    image_pull_secrets: [ngc-secret]
4. A Real GPU Workload
For a full disaggregated LLM-serving deployment, grab the packaged sample:
sflow sample self_contained/kubernetes/dynamo_trtllm_disagg
It shows a 3-node, 8-GPU-per-node backend with host_network, host_ipc (cross-pod CUDA IPC over NVLink), RDMA, and a read-only model PVC — wired to a k8s_mpi operator for the prefill/decode servers and plain k8s operators for the NATS/etcd/frontend infra and the benchmark client. Browse all Kubernetes starters with:
sflow sample --list
Part IV: Multi-host Docker
No scheduler, just a few machines you can already SSH into? Declare them once and
sflow treats that inventory the way it treats a Slurm partition: one docker run
per assigned host, supervised as a single task. You need sflow installed on the
driver (see Install sflow) and nothing on the hosts beyond Docker
itself — and the NVIDIA Container Toolkit for GPU tasks.
How it works (Docker pool example):
Compared with Slurm and Kubernetes:
- A host is identified by its
address. sflow derives the Docker endpoint (ssh://[user@]address) and the address peers dial to rendezvous from it. SSH must already work from the driver; port, key andProxyJumpstay in~/.ssh/config, and an ssh alias works as the address (setrendezvous_addresswhen peers cannot resolve the alias). hosts:is the node list. A backend-levelnodes:asking for a different count is rejected rather than ignored.- Docker creates no cross-host network, so cross-node traffic uses the hosts' own interfaces —
--network=hoston the operator and a port every host can reach. monitor:runs its collector on each host over the same SSH connection, so the hardware report shows the pool, not the driver.- Like Kubernetes,
sflow runis attached; there is nosflow batchfor Docker.
1. Prepare a Multi-host Workflow
The packaged two-host torchrun smoke test is the smallest complete example:
sflow sample self_contained/docker/multi_node # writes multi_node.yaml
Its essentials — the pool, the operator, and a task that spans the pool:
backends:
  - name: docker_cluster
    type: docker
    default: true
    image: ${{ variables.PYTORCH_IMAGE }}
    hosts:
      - name: node-0
        address: ${{ variables.HOST_0_ADDRESS }}   # 10.0.0.11, or an ssh alias
        gpus_per_node: ${{ variables.GPUS_PER_NODE }}
      - name: node-1
        address: ${{ variables.HOST_1_ADDRESS }}
        gpus_per_node: ${{ variables.GPUS_PER_NODE }}

operators:
  - name: torchrun_container
    type: docker_run
    image: ${{ variables.PYTORCH_IMAGE }}
    extra_args:
      - --entrypoint=        # third-party images may set one; sflow launches through bash
      - --network=host       # the rendezvous port must be reachable on the host interface

workflow:
  name: docker_multi_node
  tasks:
    - name: distributed_job
      operator: torchrun_container
      resources:
        nodes:
          count: ${{ variables.NUM_NODES }}
        gpus:
          count: ${{ variables.NUM_NODES * variables.NPROC_PER_NODE }}   # TOTAL across the task's nodes
      script:
        - >
          torchrun
          --nnodes="$SFLOW_TASK_NUM_NODES"
          --node-rank="$SFLOW_TASK_NODE_INDEX"
          --master-addr="$SFLOW_LEADER_ADDRESS"
          --master-port=${{ variables.MASTER_PORT }}
          ...
The same SFLOW_TASK_NUM_NODES / SFLOW_TASK_NODE_INDEX / SFLOW_LEADER_ADDRESS
variables you used on Slurm are set in every container, so a launcher command does
not change between backends. A host may also carry its own user, mounts and
extra_args for a pool that is not uniform — see
Multi-node Docker hosts.
2. Run Across the Pool
Point the recipe at your machines with --set (or edit the variable defaults),
validate without touching them, then run:
sflow run -f multi_node.yaml \
  -s HOST_0_ADDRESS=10.0.0.11 -s HOST_1_ADDRESS=10.0.0.12 -s GPUS_PER_NODE=8 \
  --dry-run

sflow run -f multi_node.yaml \
  -s HOST_0_ADDRESS=10.0.0.11 -s HOST_1_ADDRESS=10.0.0.12 -s GPUS_PER_NODE=8 \
  --tui
Before anything launches, sflow pre-flights the pool: a bounded docker version
over each host's endpoint (ssh auth, tunnel and daemon in one call) and a check that
every bind-mount source exists on that machine (Docker would otherwise create a
missing source as an empty directory). All problems across the pool are reported
together, naming the host. During the run the first member to exit non-zero
fails the task with its exit code and the peers are stopped; after a crash the
next run reclaims any container left on any host. A successful run prints both
ranks, each log line labelled with its node and rank.
Prerequisites:
ssh <address>works non-interactively from the driver to every host (keys,BatchMode); sflow never prompts.- Docker on every host; the NVIDIA Container Toolkit on every host that runs GPU tasks, with
gpus_per_nodeset to that host's GPU count. - The hosts can reach each other on the ports your launcher uses (
MASTER_PORTabove).
3. A Real GPU Workload
For disaggregated LLM serving across two hosts, grab the packaged sample:
sflow sample self_contained/docker/dynamo_vllm_disagg
It places the prefill and decode servers on different hosts of the pool, with the
NATS/etcd/frontend infra and the benchmark client as sibling tasks, and reports the
pool's GPUs in the hardware monitor. self_contained/docker/dynamo_vllm_agg is the
single-pool aggregated variant. Browse every Docker starter with sflow sample --list.