FAQs#
Workflows#
What pools and platforms are available?#
For pool/platform availability, refer to Pool CLI Reference.
How to fix 403 error when accessing OSMO UI?#
Clear your browser cache and cookies. If the problem persists, contact the admin to verify your roles.
How to fix 403 error when submitting a workflow?#
403 error indicates a permission issue when submitting workflows to the specified pool. To fix this,
Contact your admin to confirm your roles.
Clear your browser cache and cookies.
Logout and re-login. Follow the Login CLI.
Check if the pool is accessible in your profile using the Profile List CLI.
How to fix OSMO exec hangs?#
If you encounter a hang when using osmo workflow exec, you can check the following:
Check if the task has RUNNING status
If the task shows RUNNING, check if the user command (the command defined for the task in the workflow spec) is running by looking at the logs. Sometimes the task is running and downloading inputs, but the user command has not started.
If the user command is not running, wait for 5 minutes and try
osmo workflow execagain after it starts running.
How to pause and debug a workflow?#
Typically, when debugging a workflow that crashes or hangs, forcing the workflow to pause
can help you diagnose the problem. Pausing the process gives you a chance to get a remote
shell into the workflow, look inside the container, determine or fix the issue, and then unpause
the workflow when ready.
To pause a workflow, add the following command to the top of the script running inside your workflow:
while ! [ -f /done.txt ] ; do sleep 1 ; done
This causes the workflow to halt, and wait until the file /done.txt is created, after which it
resumes.
For example, your workflow might contain the following:
workflow:
  tasks:
  - name: my_task
    command: bash
    args: ["/tmp/script.sh"]
    files:
    - path: "/tmp/script.sh"
      contents: |
        while ! [ -f /done.txt ] ; do sleep 1 ; done
        # The rest of script here ...
After the workflow starts and halts, this should give you a chance to shell into the workflow (See Interactive Workflows) and potentially modify files. After you are finished with the shell, you can resume the workflow by creating the /done.txt file with the following command:
$ touch /done.txt
How to force cancel a workflow?#
When a cancel request for a workflow is submitted, it is canceled asynchronously.
If the resources associated with the workflow are not cleaned up properly on the backend,
the incoming workflows are in a PENDING state.
Forcing a cancel frees the resources instantaneously.
To force cancel a workflow, use the --force flag:
$ osmo workflow cancel --force <workflow_id>
Note
To learn more about the cancel CLI, go to cancel.
How to stop a hanging workflow without canceling it?#
In cases your workflow is hanging and you want to stop it but still have OSMO upload your output data, you can use the osmo exec command. For example:
$ osmo workflow exec <workflow_id> <task_id> --entry "/bin/sh -c \"kill -9 \\\$( ps aux | grep '[p]ython' | head -n1 | awk '{print \\\$2}' )\""
This command will kill the first python process running in the workflow and allow OSMO to upload the output data.
It is equivalent to first shell into the task and then run the command manually:
$ osmo workflow exec <workflow_id> <task_id>
$ /bin/sh -c "kill -9 $( ps aux | grep '[p]ython' | head -n1 | awk '{print $2}' )"
How to reschedule a running task?#
If you have a task that is hanging and you want to reschedule it, you can configure exit actions in your workflow specification.
Add exit actions to your task definitions in the workflow YAML:
workflow:
  tasks:
  - name: my_task
    exitActions:
      RESCHEDULE: 137
Kill the hanging processes in the tasks using the following command for example (Assuming your hanging process is a python script):
$ osmo workflow exec <workflow_id> <task_id> --entry "/bin/sh -c \"kill -9 \\\$( ps aux | grep '[p]ython' | head -n1 | awk '{print \\\$2}' )\""
When you use kill -9 to terminate a process, it sends the SIGKILL signal. The process will exit with code 137 (128 + 9), which triggers the RESCHEDULE action you configured.
Note
This also means your task will automatically be rescheduled if it is failed due to OOM. For more information about exit actions, see Exit Actions.
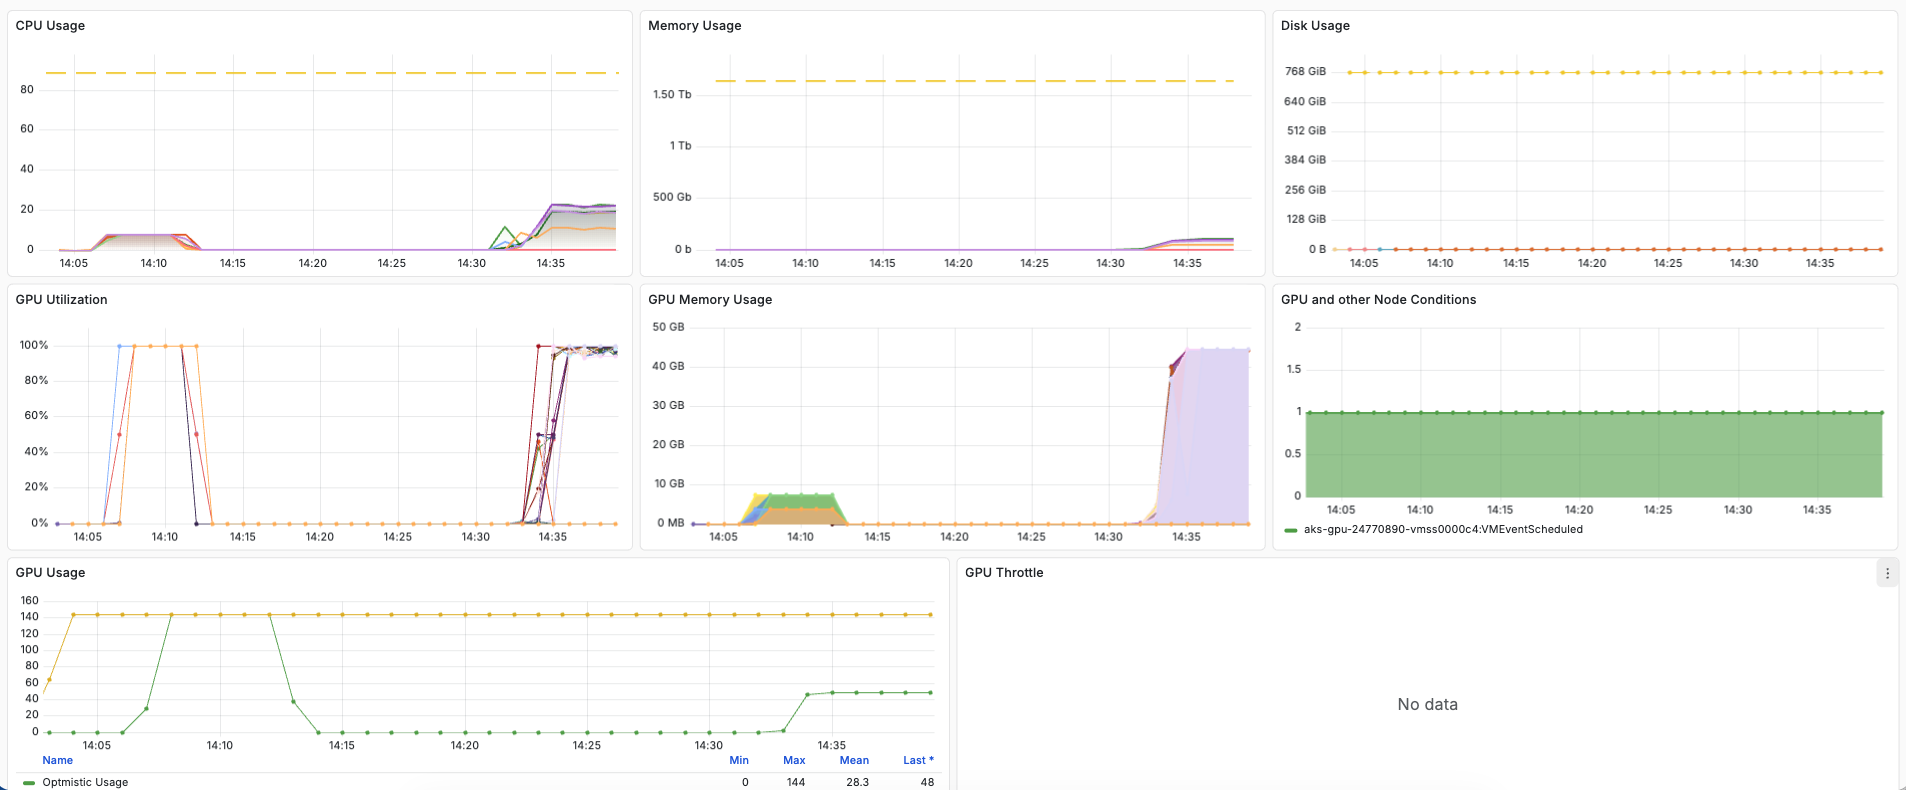
How to determine the resource usage of a workflow?#
Follow the grafana_url for your workflow fetched using the query CLI to determine the resource usage of your workflows.
Alternately, you can click on the Resource Usage button in the UI on the detailed workflow information page.
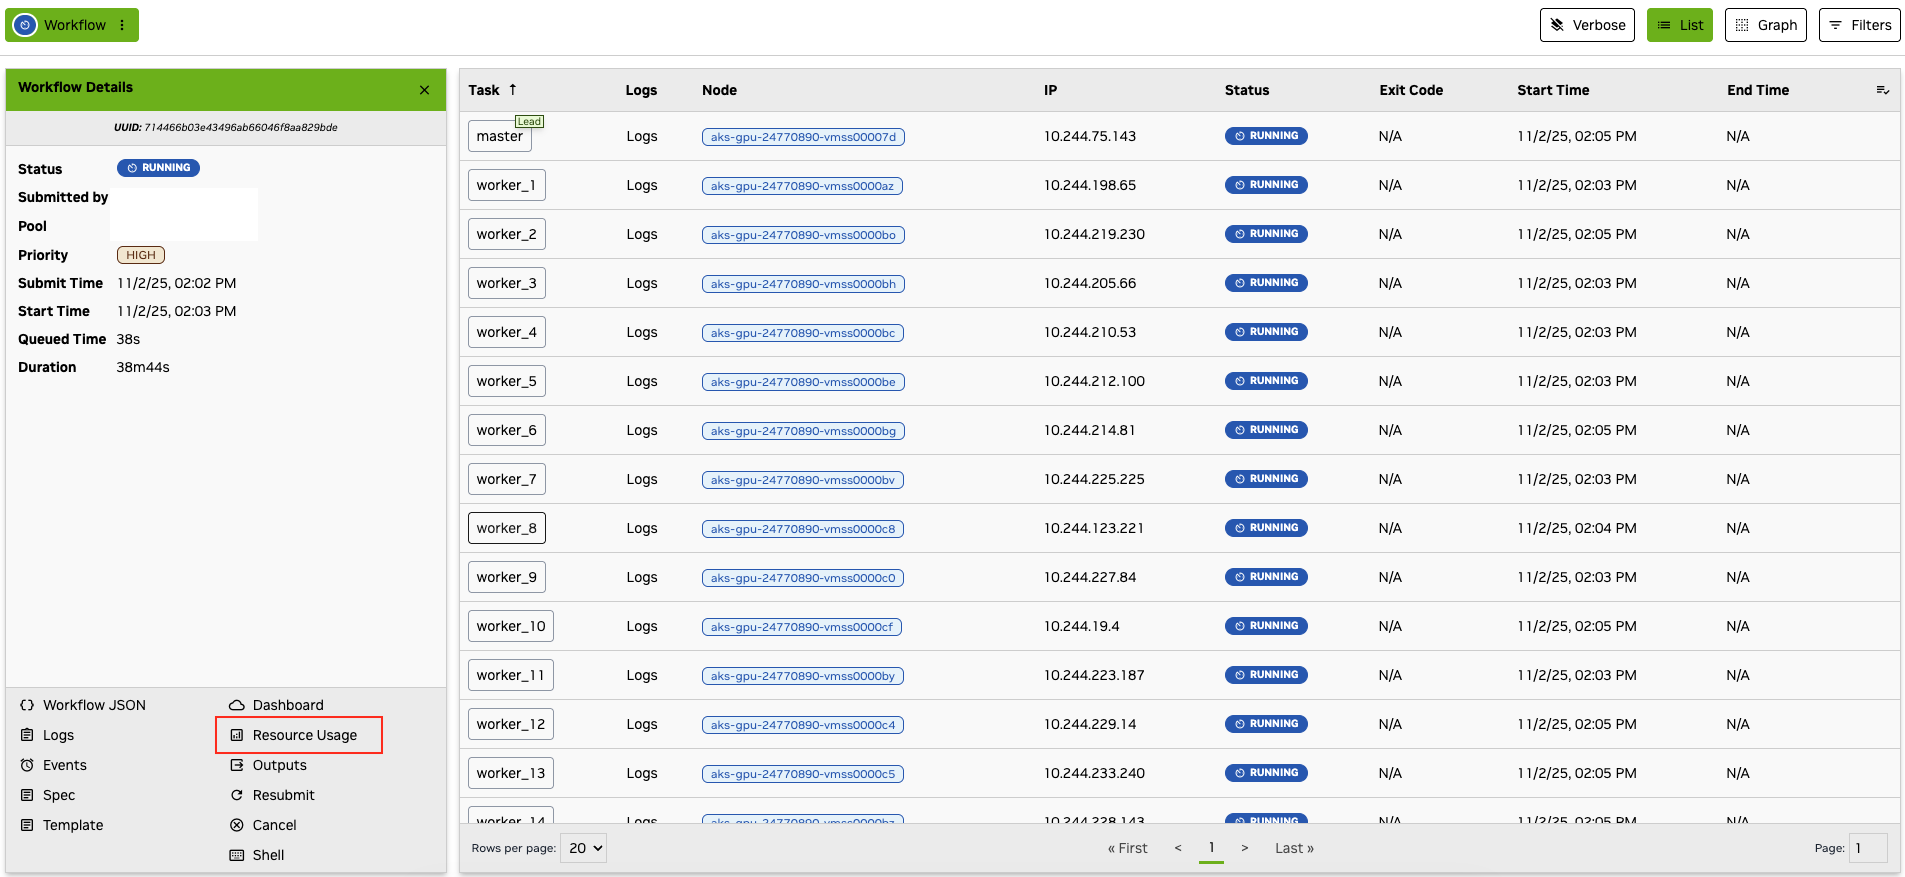
Grafana dashboard displays resource usage metrics for CPU, memory, and GPU for your workflow.
How to browse previously submitted workflows?#
Refer to workflow list to list workflows.
How to mount data inside the workflow?#
Mounting inputs inside a workflow is not supported. Contact your admin to setup NAS or LFS support.
How to update data inside the workflow?#
Write task outputs to {{output}} or configured workflow output paths. See Inputs and Outputs.
How to Handle Failed Tasks?#
To manually rerun tasks in a workflow that have failed, see restart
To have your workflow automatically reschedule and retry failed tasks, see Exit Actions
For a practical example of rescheduling training workflows for backend errors, see here .
How to save the intermediate data when the workflow is stuck or hangs?#
You can save your data in the workflow by running the OSMO CLI while exec’d into the workflow.
See Running OSMO CLI in a Workflow for how to perform this operation.
How to access a private GitHub repository from a workflow?#
Create an access token
Log into GitHub and create a classic personal access token if you don’t already have one. Be sure to give the token all repo permissions.
Verify that the token is valid by cloning the repo locally
git clone https://token:ghp_xxxxxxxxxxxx@g<token>@github.com/<user>/<repo>.git
Create an osmo secret for the token
export GITHUB_TOKEN=ghp_xxxxxxxxxxxx
osmo credential set github-pat --type GENERIC --payload "github-pat=$GITHUB_TOKEN"
Use the secret in a workflow
First, add the credential to any tasks in the workflow that need to access GitHub.
workflow:
  name: my_workflow
  tasks:
  - name: my_task
    credentials:
      github-pat: /tmp/github
Then, run the following code in the workflow to authenticate and clone the repo.
# Configure git to use the token for all requests to GitHub
GITHUB_PAT=$(cat /tmp/github/github-pat)
git config --global credential.helper store
echo "https://token:${GITHUB_PAT}@github.com" > ~/.git-credentials
git config --global credential.helper 'store --file ~/.git-credentials'

# Clone the repo
git clone https://github.com/<user>/<repo>.git
How to find a task’s IP address from another task within the same group?#
Tasks in the same group can communicate with each other through network.
OSMO token {{host:<task_name>}} (see Special Tokens) can be used as the hostname of a task.
In case you need to find the IP address of a task, you can use the following command to resolve the hostname to an IP address:
TASK_IP=$(nslookup {{host:<task_name>}} | grep -oP \
  'Address: \K\d[0-9]{1,3}\.[0-9]{1,3}\.[0-9]{1,3}\.[0-9]{1,3}' | head -n1)
How to upload a file/directory as an input to a workflow?#
Use files with localpath when you need to inject individual local files into a task.
For larger inputs, place the data in external storage and reference it with url in the task’s
inputs field. For more information, see File Injection and
Inputs and Outputs.
How to debug when preemption occurs?#
When a task is preempted, it will have the status FAILED_PREEMPTED and exit code 3006.
You can also check task events to see preemption events from the scheduler.
If you need to automatically retry preempted tasks, you can configure exit actions to reschedule the task when it receives exit code 3006.
See Exit Codes for more information.
Your admin can configure the default exit action to RESCHEDULE the task when it receives exit code 3006.
The preempted task will be rescheduled with the same priority up to maximum time limit before it fails with status FAILED_PREEMPTED.
Check with the admin about current configurations.
Why is my workflow not getting scheduled quickly?#
There are several reasons why your workflow might be stuck in a PENDING state.
Here are the most common causes and how to investigate them:
Resource Availability
Check if the requested resources (CPU, GPU, memory) are available in your pool
Use the Resource CLI commands to see current resource utilization
Consider if both total resources and resource per node are available in your pool
Consider adjusting your resource requests if they’re too high
Pool Quotas and Sharing
Use the Pool CLI commands to check if your pool has reached its quota limit
You cannot exceed the quota for non-preemptible workflows (HIGH/NORMAL priority)
Submit preemptible workflows if you want to use shared quotas.
For example, if you submit a normal/high priority workflow to this pool with 10 GPUs:
                                                        Quota Used   Quota Limit   Total Usage   Total Capacity
============================================================================================================
example-pool   Join role: example-role      ONLINE      96           100           96            200
============================================================================================================
                                                        96           100           96            200
Because the current quota used is 96 GPUs, and quota limit is 100 GPUs, a workflow with 10 GPUs would go over the quota limit (96 + 10 = 106), causing the workflow to be pending.
Workflow Priority
Higher priority workflows get scheduled first within the pool quota (See Scheduling)
Check your workflow’s priority setting
Consider adjusting priority if appropriate
Initializing
Sometimes workflows show
PENDINGstatus because they are initializing.Check the task status and events to see detailed information.
More Information
Workflow and task events can provide more information about status and scheduling details.
Use the query command for verbose task information. This is useful for checking rescheduling actions.
What is the difference between quota limit and total capacity?#
The quota limit is the number of GPUs that can be used by normal/high priority workflows.
The total capacity is the total number of GPUs that can be used by all workflows in the pool, including low priority (preemptible) workflows.
For example, if the total capacity is greater than the quota limit:
                                                        Quota Used   Quota Limit   Total Usage   Total Capacity
============================================================================================================
example-pool   Join role: example-role      ONLINE      96           100           96            200
============================================================================================================
                                                        96           100           96            200
This usually means that the pool is sharing resources with another pool. The quota limit for each pool guarantees that users of that pool always has access to those GPUs through normal/high priority workflows. The difference between total capacity and quota limit (200 - 100 = 100) is the number of GPUs that can be used by low priority workflows when the other pool is not using its quota limit. But when the other pool is using its quota limit, the low priority workflows will be preempted.
How to use NVIDIA NIM with OSMO?#
NVIDIA NIM allows you to easily deploy containerized models anywhere.
OSMO can be used to both run a NIM as part of a workflow, or it can connect to NIMs hosted through NGC.
First, you will need a NGC API key. If you don’t have one, you can follow the instructions at NIM Getting Started to create one.
Next, you will need to create an OSMO secret for the api key.
export NGC_API_KEY=<your-api-key>
osmo credential set ngc-api-key --type GENERIC --payload "key=$NGC_API_KEY"
Using a NIM hosted in NGC#
The following workflow shows an example of using a NIM hosted in NGC.
workflow:
  name: use-nim-from-ngc
  tasks:
  - name: use-nim
    image: ubuntu:24.04
    credentials:
      ngc-api-key:
        NGC_API_KEY: key
    command:
    - bash
    - -c
    - |
        # Install curl and jq to make API calls to the NIM API
        apt update && apt install -y curl jq

        # Define the prompt to send to the NIM API
        data=$'{
          "model": "meta/llama-3.2-1b-instruct",
          "messages": [
            {
              "role": "user",
              "content": "Write a limerick about the wonders of GPU computing."
            }
          ],
          "temperature": 0.2,
          "top_p": 0.7,
          "frequency_penalty": 0,
          "presence_penalty": 0,
          "max_tokens": 48,
          "stream": false
        }'

        # Make the API call to the NIM hosted in NGC and parse the response
        curl -X POST \
        --url "https://integrate.api.nvidia.com/v1/chat/completions" \
        --header "Authorization: Bearer $NGC_API_KEY" \
        --header "Accept: application/json" \
        --header "Content-Type: application/json" \
        --data "$data" |
        jq -r '.choices[0].message.content'
Running a NIM in an OSMO workflow#
You can run NVIDIA Inference Microservices (NIMs) directly in your OSMO workflows. This allows you to either host a NIM server as part of your workflow or connect to an external NIM service.
For a complete guide with examples, see the NIM workflow example .
Data#
How do I upload or download data?#
Use storage URLs in workflow inputs and outputs for workflow data movement, or use
the osmo data CLI for direct storage operations. See Working with Data
and osmo data.